PRIMARY 6 INTEGRATED SCIENCE
TOPIC 9: SCIENCE AT HOME AND IN OUR COMMUNITY
1. Preparation of Clean and Safe Water for Drinking
Safe Water: Safe water is water that is free from germs. The methods of preparing safe water for drinking are boiling, chlorination, and fluoridation.
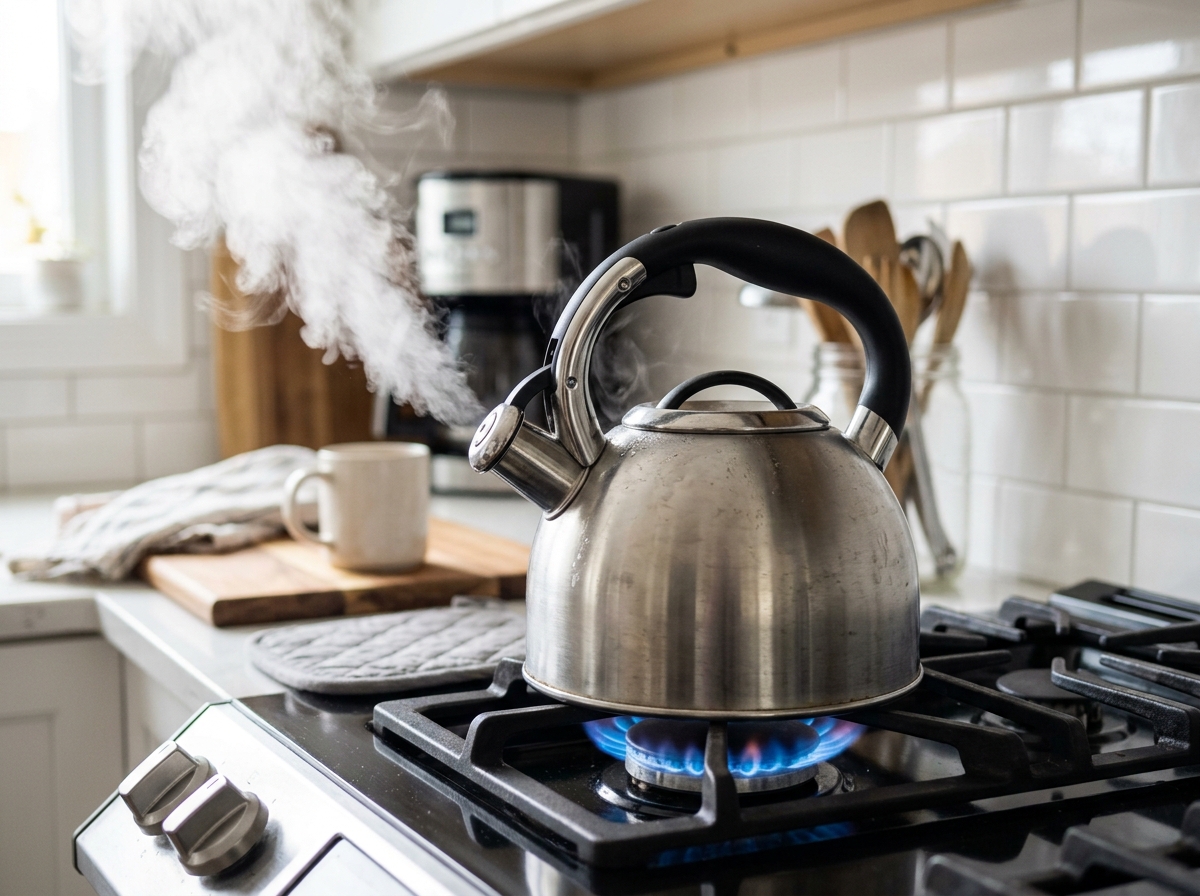
Boiling: Boiling is the cheapest and commonest method of making water safe for drinking. Water should be boiled to kill germs in it. It is the best method of making water safe for drinking because boiling kills all germs in water.
Steps taken when boiling water for drinking:
- Put clean water in a clean kettle or a saucepan.
- Put the kettle or saucepan on fire.
- Boil the water until it is ready. You will see steam coming out of the spout.
- Remove the water from the fire. Keep it in a clean container and a safe place to cool.
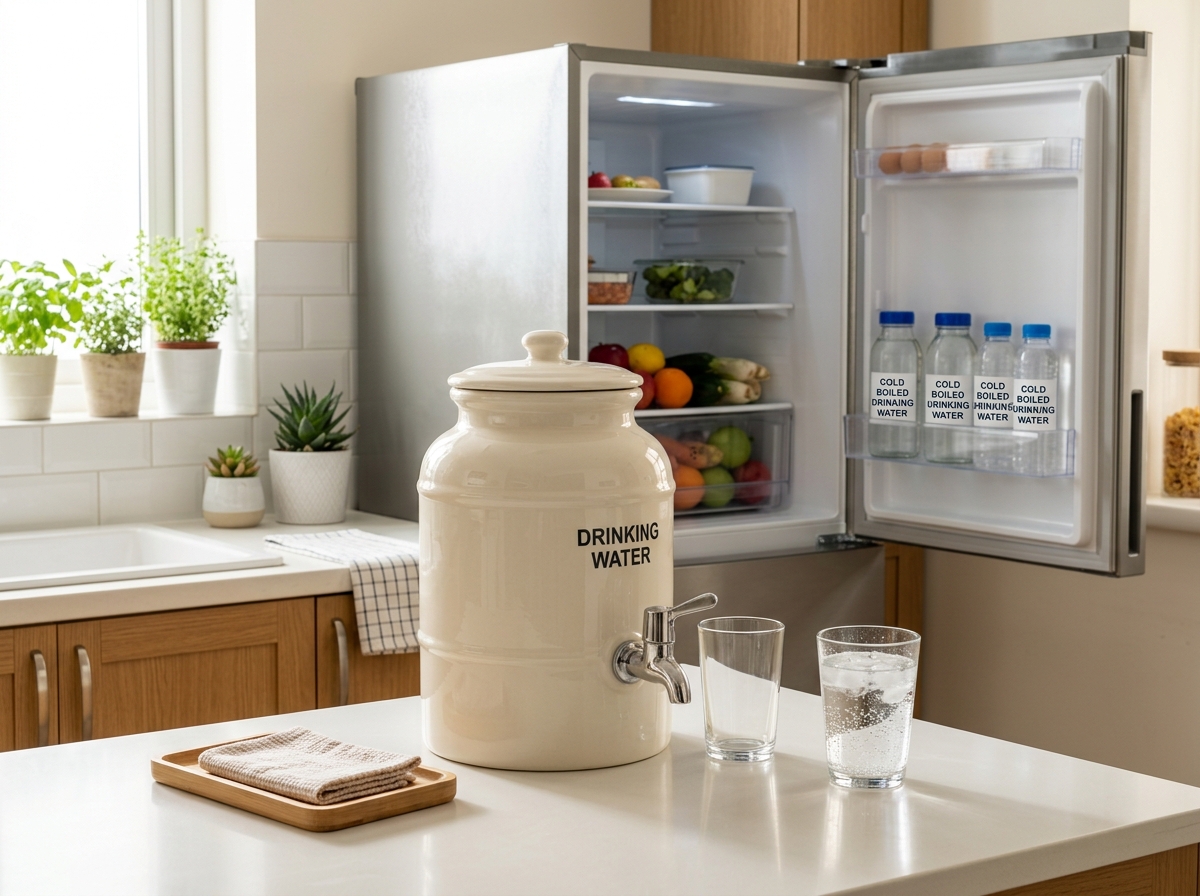
- Cooled water should be put in a clean container and covered to prevent recontamination.
Safe Storage: Water can also be put in small containers and kept in a refrigerator. A refrigerator keeps water cold and keeps it free from germs.
Treating Water Using Chemicals:
Chemicals used include: chlorine, iodine, calcium chloride, fluorine, and potassium permanganate. These chemicals kill germs in water.
- Chlorination: A method of purifying water by bubbling small amounts of chlorine through it to kill germs. Chlorine kills germs in water.
- Fluoridation: The addition of small amounts of fluoride salts/fluorine to drinking water. Fluorine kills germs in water.
Disadvantages of using chemicals to treat water:
- ✓ Chemicals are expensive to buy.
- ✓ Chemicals add taste and smell in water.
- ✓ Chemicals do not make water clear.
2. Methods of Preparing Clean Water for Washing (Filtration & Decantation)
Clean Water: Clean water is water that is free from impurities/dirt.
Filtration: Filtration is a method of separating liquid from solid particles. It is used to remove solid impurities from water.
- Residue: The solid particles that remain on the filter paper or cloth.
- Filtrate: The clear water that passes through the filter paper.
- Sediment / Precipitate: The solid particles that remain behind when pouring water.
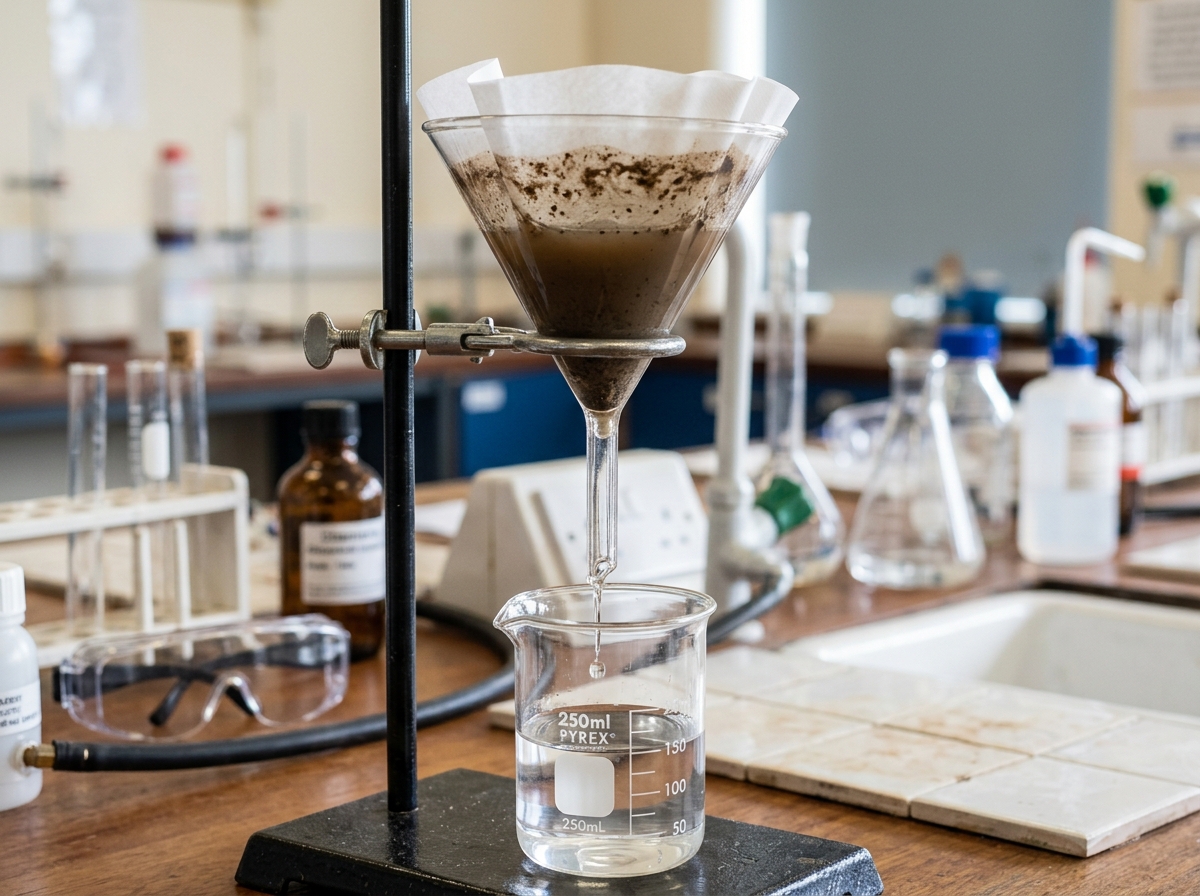
Important Warning: The water filtered is not necessarily safe for drinking because filtered water still contains germs. Filtered water must be boiled before drinking to kill germs.
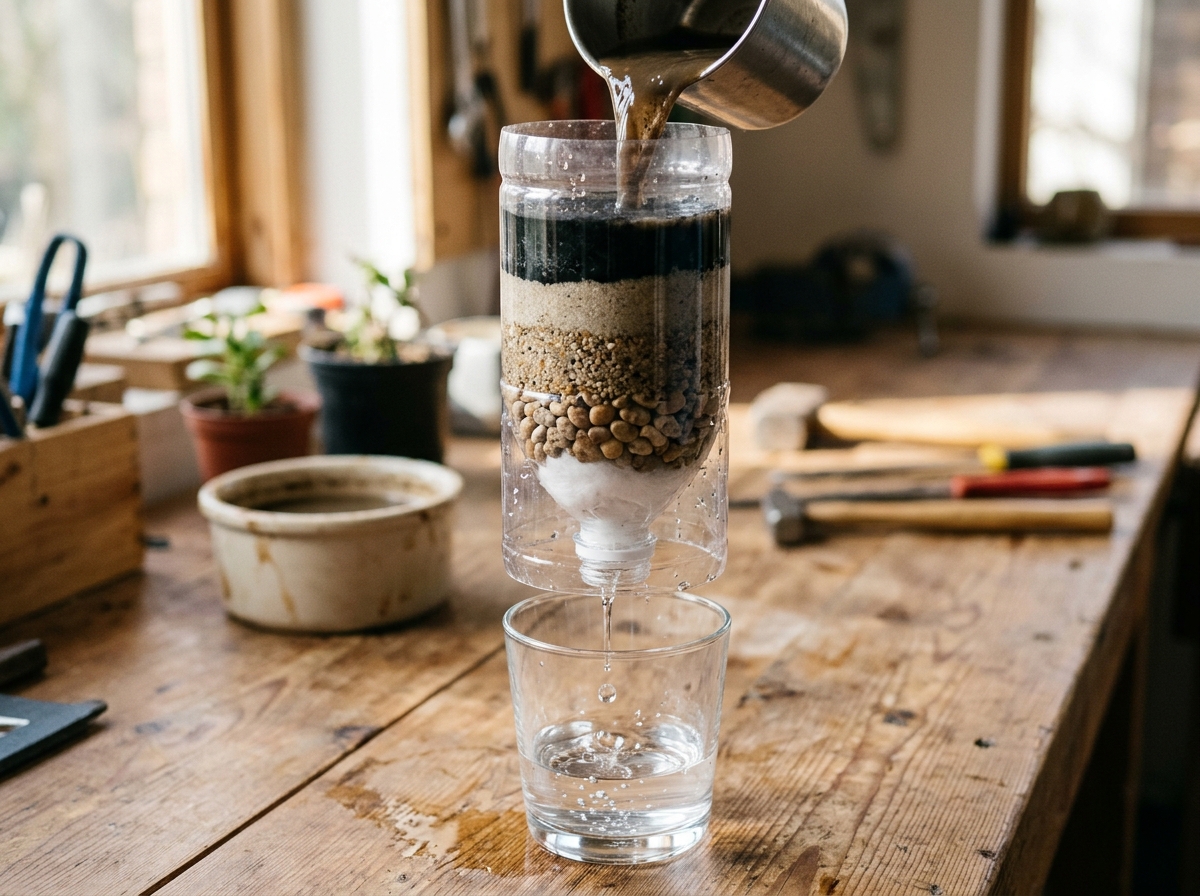
Local materials used for filtering water: Coarse sand, gravel, cotton wool, charcoal paste, sisal fibre, banana fibre, pebble, grass, and clean cloth.
- Charcoal: Removes toxins and smell from water.
- Fine sand, coarse sand, and coarse stones: Trap impurities in water.
Decantation: Decantation is the process of pouring off clear water leaving settled dirt at the bottom of a container. Impurities are first allowed to settle at the bottom. Clean water is then carefully poured out into another container leaving behind the impurities.
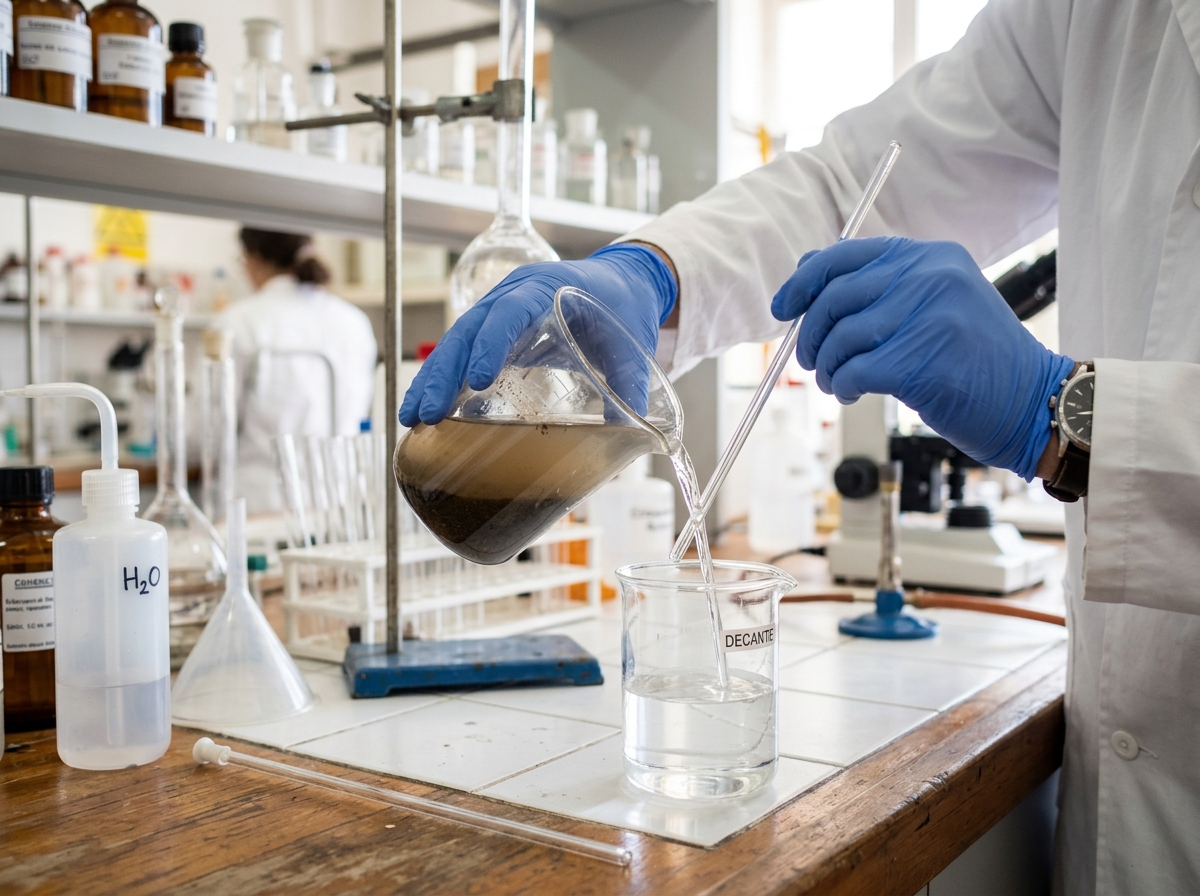
Function of glass rod: Used to carefully stir the mixture during decantation and ensures clean decanting of water without disturbing the settled materials.
Health Note: Decanted water is not safe for drinking because it contains germs. It must be boiled or treated using chemicals.
3. Distillation & Municipal Water Purification Systems
Distillation: The muddy water is heated until it evaporates. The vapour is then condensed to obtain pure water. (Also used in purifying alcohol).
- Distillate: The liquid condensed from water vapour during distillation.
- Why distilled water is NOT recommended for drinking: Distilled water lacks mineral salts. During distillation, mineral salts remain in the heating container as water evaporates.
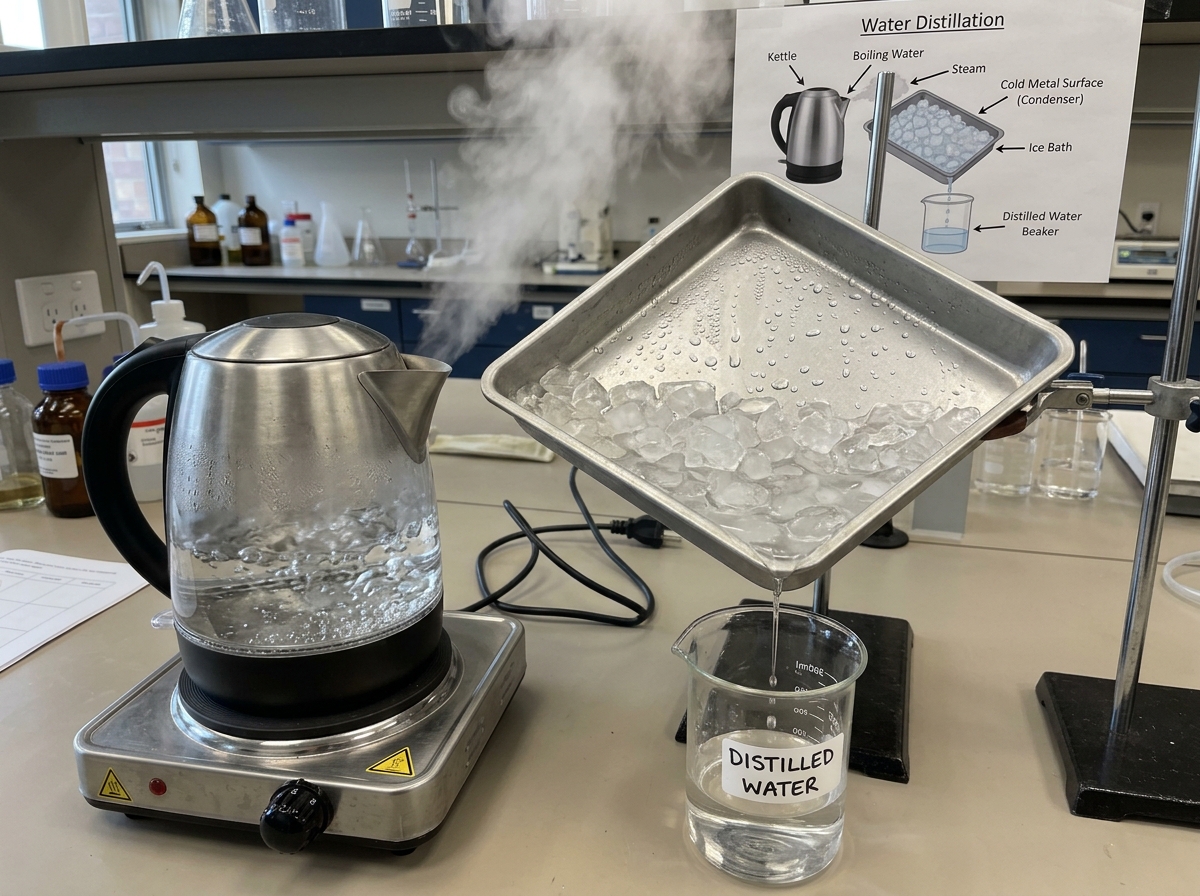
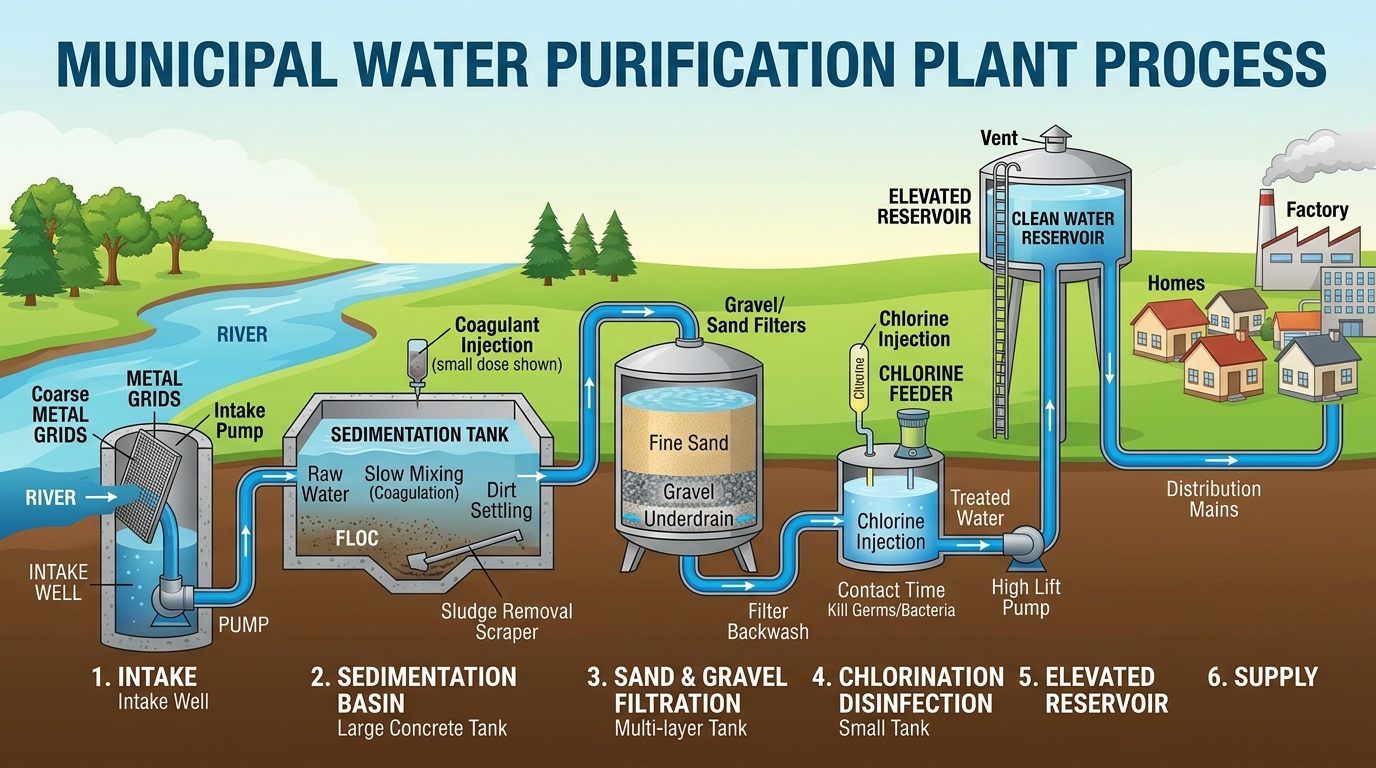
Six Uses of Distilled Water: Laboratory experiments, cleaning wounds, mixing medicines in hospitals, cleaning medical equipment, automobile batteries, and steam irons.
4. Preparing Local Salt from Plant Ash Using Filtration
Materials: Water, sieve, banana leaf, dry bean plant leaves, 2 containers, flat metal sheet.
Procedure:
- Burn the dry bean plant leaves to get plant ash.
- Gently place the banana leaf on the sieve.
- Take the sieve with a banana leaf and place on the cup.
- Transfer the plant ash onto the sieve and add water to make a solution.
- Leave the solution to collect in the cup for some time. The solution tastes salty.
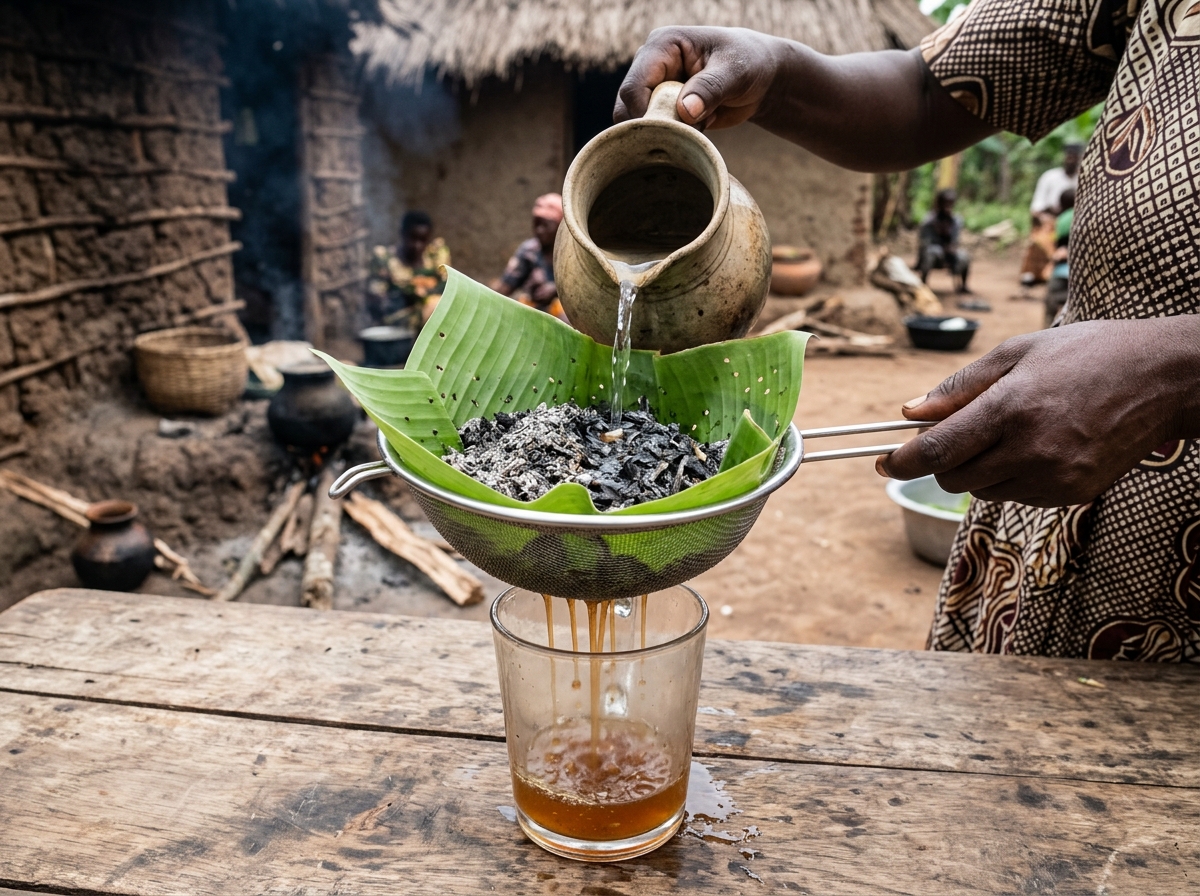
Chemical Note: The solution can be boiled to evaporation to dryness to obtain solid salt. Local salt is rich in sodium chloride and tastes sour/salty due to high concentration of sodium chloride.
Importance of Local Salt: Used to soften food during cooking, as a preservative, as pesticide, as local medicine to cure stomach upsets, added to sauce to get ready faster, cooked with vegetables to add flavour, and added to lemon to reduce sour taste.
Foodstuffs cooked with local salt: Tomatoes, beans, pigweeds, cowpeas, and pumpkin leaves.
5. Water Impurities & Silting of Water Bodies
Water Impurities: Human wastes, animal wastes, industrial wastes, silt from soil erosion, agrochemicals.
Silting: Silting is the deposition of eroded soil particles into water bodies. Soil erosion is the major cause of silting in water bodies.
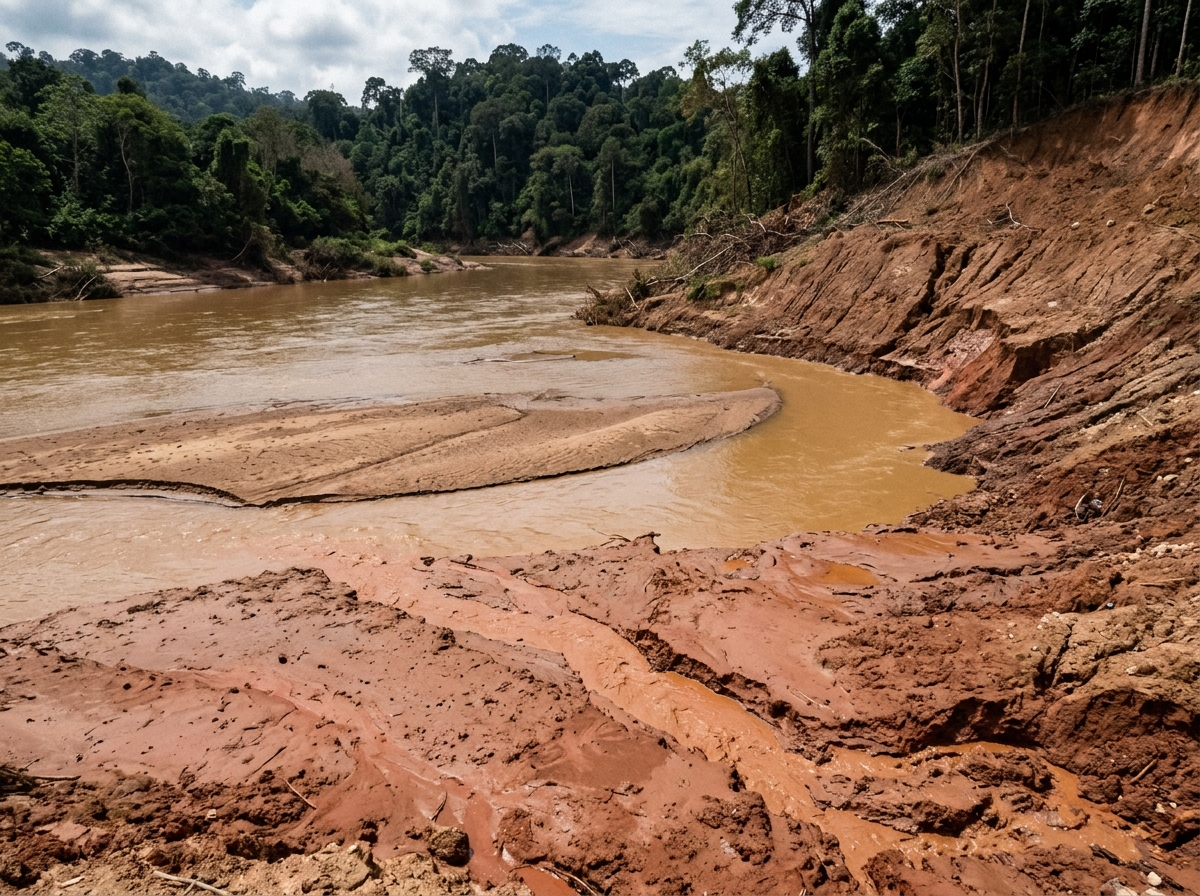
Human activities causing silting: Cultivating along river banks, grazing animals near water bodies, spilling sediment near water bodies, sand mining in and near lakes, dam construction, road building near water sources, deforestation near water bodies.
Effects of silting: Exposes aquatic animals to predators, leads to death of aquatic animals, blocks proper oxygen supply to aquatic animals, blocks food for aquatic animals, destroys habitats for aquatic life, causes floods, causes the creation of shallow water bodies.
Control of silting: Leaving river banks and lake shores uncultivated, dredging water sources, maintaining vegetation near river banks and lake shores, avoid grazing animals near river banks and lake shores.
6. Cleaning Clothes in a Home (The Laundry Process)
Reasons why clothes should be cleaned regularly:
- ✓ To prevent the spread of skin diseases.
- ✓ To prevent the breeding of body lice.
- ✓ To prevent bad body smell.
The 7 Laundry Steps (In Correct Order):
- Sorting: Separating clothes based on Colour, Intensity of dirt, and Texture.
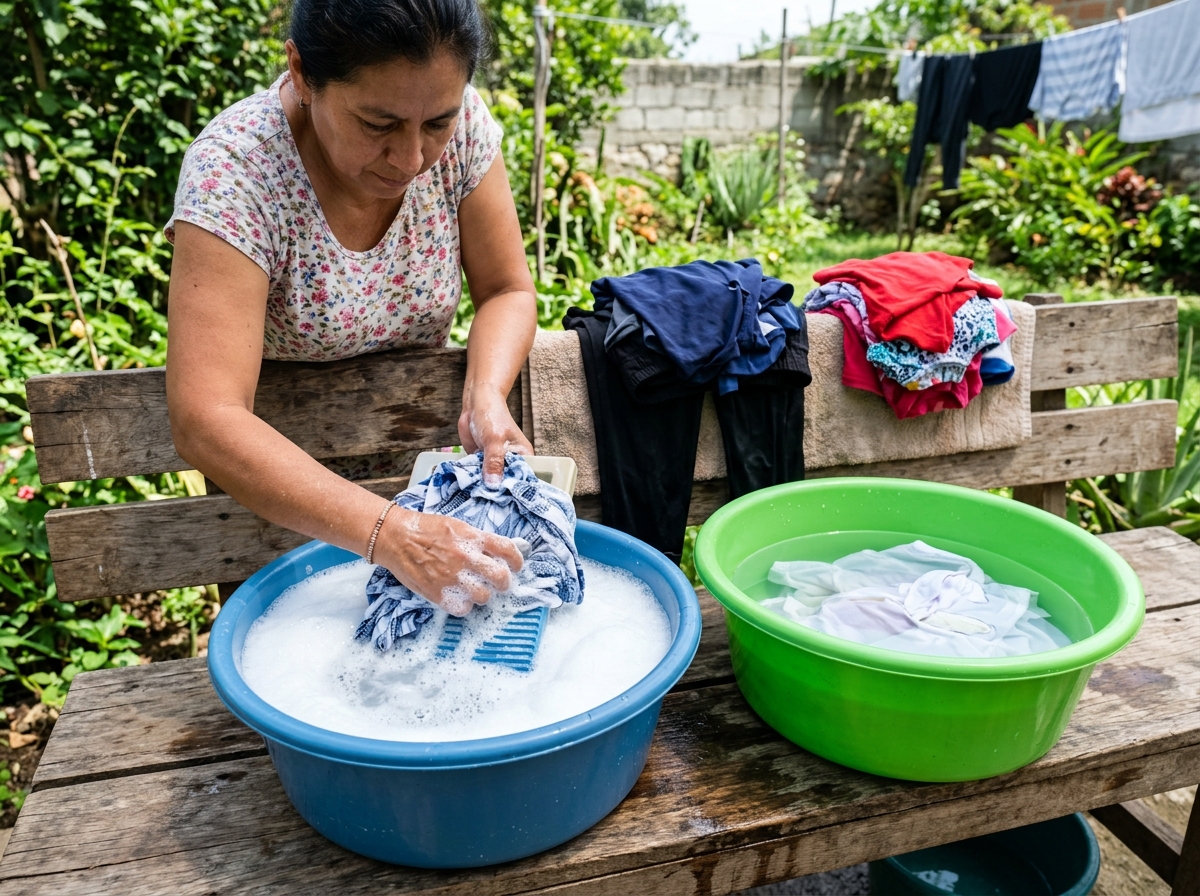
- Soaking: Placing dirty clothes in soapy water to loosen dirt and soften tough stains.
- Washing: Actively scrubbing fabrics in lathered water to lift and separate dirt particles.
- Rinsing: Immersing washed clothes in clean, soap-free water to remove soapy residues.
- Wringing: Squeezing clothes to remove excess water, shortening drying time.
- Drying: Hanging wet clothes on clean lines. White clothes under direct sun; colored clothes in the shade.
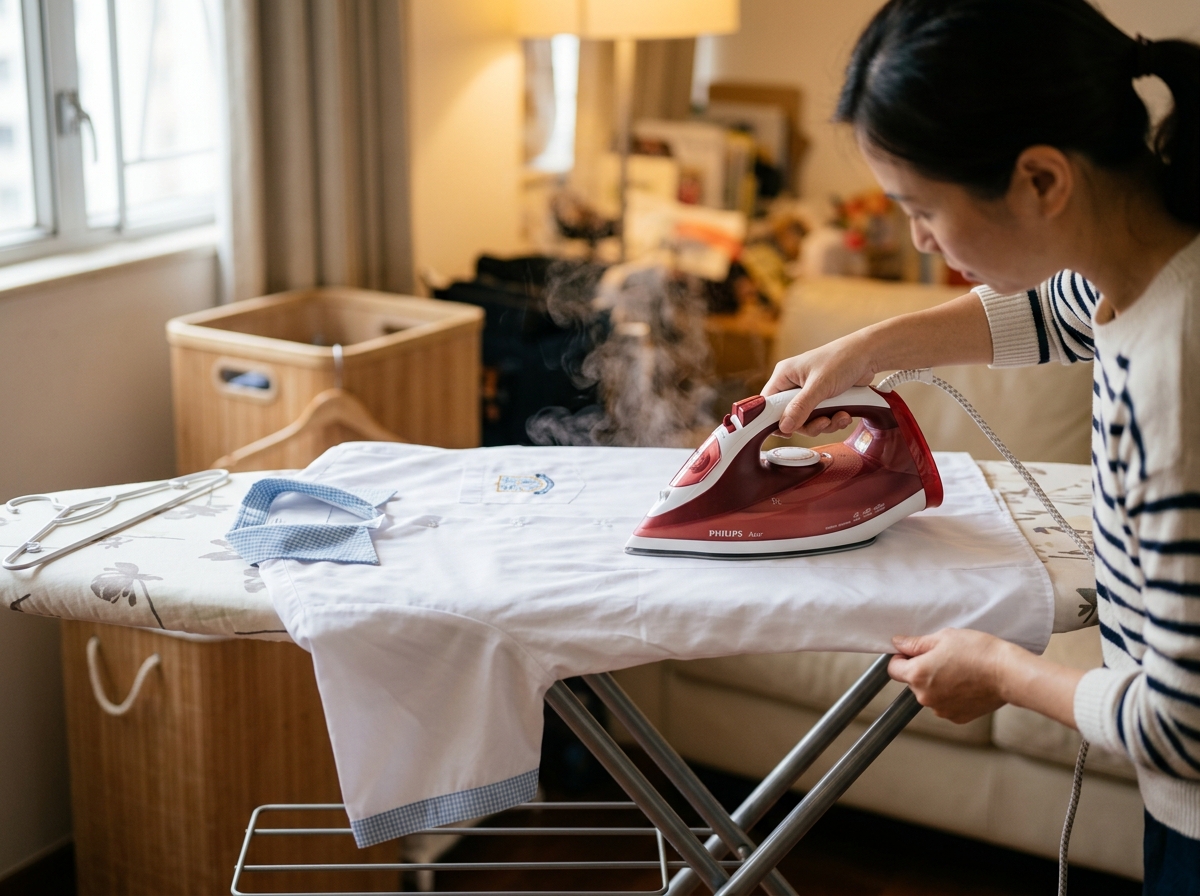
- Ironing: Passing a hot iron over dry clothes to remove folds/wrinkles and kill ectoparasites (body lice, bedbug eggs).
Setup: Inverted plastic bottle with bottom cut off, stacked with cotton wool, pebbles, coarse sand, fine sand, and charcoal paste.
Answer the following questions based on the textbook experiment:
📝 Official Evaluation Activity 9.1 & 9.2 (PLE Revision)
1. Name two methods of obtaining clean water for washing at home.
2. In which method of making water clean do you first allow impurities to settle at the bottom of a container?
3. Why is water obtained by distillation method not good for domestic drinking?
4. How does boiling make water safe for drinking?
5. State any two ways in which local salt prepared from plant ash is useful to people.
6. State the major cause of silting in water bodies.
7. Give two reasons why woolen clothes should be dried without wringing.
8. Match the Laundry Step (Part A) to its Meaning (Part B):
| Laundry Step (Part A) | Meaning / Purpose (Part B) |
|---|---|
| Sorting | |
| Soaking | |
| Rinsing | |
| Wringing |
TOPIC 10: ACCIDENTS AND FIRST AID
1. Accidents, Casualties, Burns and Scalds
Accident: An accident is a sudden happening that can cause injury or death to a victim.
Casualty: An accident victim is called a casualty.
Common forms of accidents: Burns and scalds, fever and convulsions, near drowning, fainting, foreign bodies in passages, and poisoning.
Burns and Scalds
Burn: A skin injury caused by dry hot substances.
Examples of dry hot substances: Hot electric iron, hot jikos, hot cooker, acid, hot saucepan, and burning firewood.
Causes of burns: Skin contact with hot metals, skin contact with acids, skin contact with burning wood fuel, skin contact with bare electric wires carrying current.
Scald: A skin injury caused by wet hot substances.
Examples of wet hot substances: Hot water, hot sauce, hot milk, and hot porridge.
Causes of scalds: Skin contact with steam, skin contact with hot liquids.
Degrees of Burns (Coursebook Page 188)
- First degree burn: Blisters are not formed. Only outer epidermis is affected.
- Second degree burn: Blisters are formed (fluid-filled swellings beneath the epidermis).
- Third degree burn: This is the severe burn in which the skin is burnt deeply and appears shiny white.
Danger: This degree of burns leads to dehydration because the casualty loses a lot of fluids in the body. The casualty should be given a lot of fluids like fruit juice or ORS to replace lost body fluids!
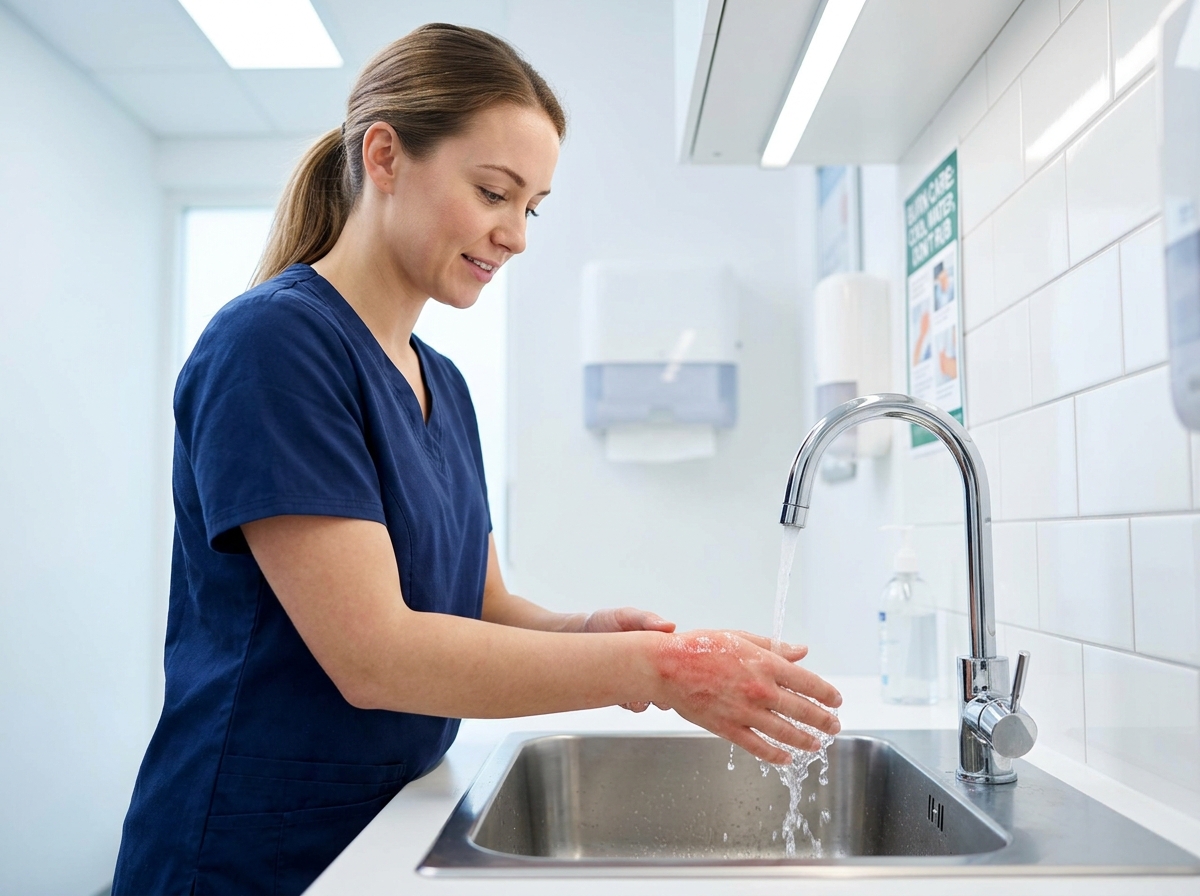
Reasons Why a Scalded or Burnt Part is Dipped in Clean Cold Water (Coursebook Page 189)
- To cool temperature around the injured part.
- To reduce further damage on the skin tissues.
- To reduce swelling of the burnt area.
- To relieve pain.
- To minimize the formation of blisters at the burnt part.
Precautions Against Burns and Scalds (Official DONTs - Coursebook Page 189)
- Never put cow dung or soil on the injured part. Reason: Cow dung attracts germs to the wound.
- Never apply cooking oil on the injured part. Reason: It causes infections and traps heat.
- Never apply sugar. Reason: Sugar attracts bacteria and absorbs water from the skin.
- Never apply salt on the part. Reason: Salt causes dehydration.
- Never burst blisters. Reason: It causes wounds leading to germ infection.
Prevention of burns and scalds: Use insulators to carry hot objects; cook from raised places; keep flammable liquids away from fire; put out all fire after use; avoid leaving burning candles in rooms where there are clothes.
2. Fever and Convulsions
Fever: Fever is the condition in which the body temperature rises beyond the normal (above 37°C).
Excessive sweating is the main sign of fever.
Causes of fever: Diseases like malaria, food poisoning, and putting on too tight clothes.
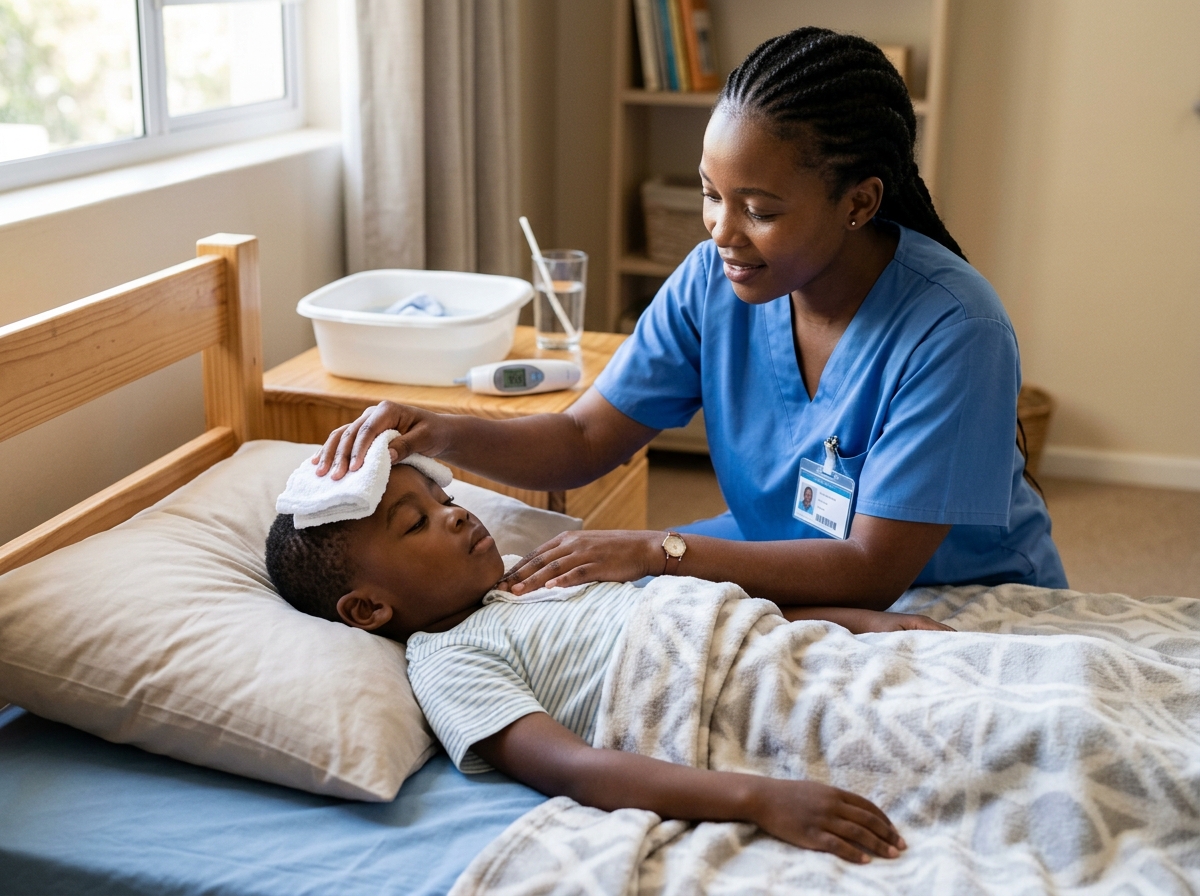
First Aid for Fever (Coursebook Page 189–190)
- Tepid sponging the casualty: Tepid sponging is the use of a clean piece of cloth to apply lukewarm water on the body of a casualty with fever. Tepid sponging cools the body temperature of the victim. Lukewarm water opens the sweat pores to let out excess heat from the body.
- Loosen tight clothes on the victim to enable the victim to get fresh air.
- Give the casualty plenty of drinks to prevent dehydration.
Very cold water should not be used to tepid sponge the victim.
Reason: Cold water causes shivering to the victim which increases heat production in the body!
Convulsions (Coursebook Page 190)
Convulsion: The rapid uncontrolled shaking/jerking of the body. Fever is the main cause of convulsions.
Signs and symptoms of convulsions: High body temperature, violent shaking of the body, frequent urination, excessive sweating, bubbles of saliva in the mouth.
First aid for convulsions:
- Put a hard material in the mouth of convulsing victim. Reason: To prevent the victim from biting the tongue.
- Place the victim in a safe place to avoid injury by surrounding objects.
- Make sure the victim gets plenty of fresh air.
- Loosen/remove most of the clothes to enable the victim to get fresh air.
- Apply tepid sponging to cool the body temperature.
Prevention of fever and convulsions: Controlling mosquitoes; early treatment of infections; immunizing children; maintaining proper hygiene.
1. How is a burn different from a scald?
2. A child suddenly removed the cover of a saucepan full of boiling water. One of the child's arms was burnt.
(b) What kind of accident did the child get?:
(c) State the first aid you would give to the child:
(d) Give any one way in which the child would avoid the accident mentioned in (b) above:
3. Give any one reason why the burnt part on the skin is dipped in cold water.
4. Why is it not advisable to burst blisters on the burnt part of the skin?
5. How is tepid sponging useful to a victim with fever?
6. What kind of water is encouraged to use during tepid sponging?
7. Why is it not advisable to give a convulsing person food to eat?
8. State the first aid given to a casualty with burns.
9. Which health condition can result from severe burns and scalds?
10. Give a reason why a hard object should be put in the mouth of a convulsing victim.
3. Near Drowning and Fainting
Near Drowning: A condition in which one's lungs are filled with water and fails to breathe but not yet dead.
Drowning: Dying as a result of having lungs filled with water.
Exam Fact: It is impossible to give first aid to a drowned casualty because they are already dead.
Causes of near drowning: Flooding in an area, capsizing of boats due to rain storms, failure/inability to swim, being drunk while in deep water, attack by disease during swimming (epilepsy), muscle pull while in water.
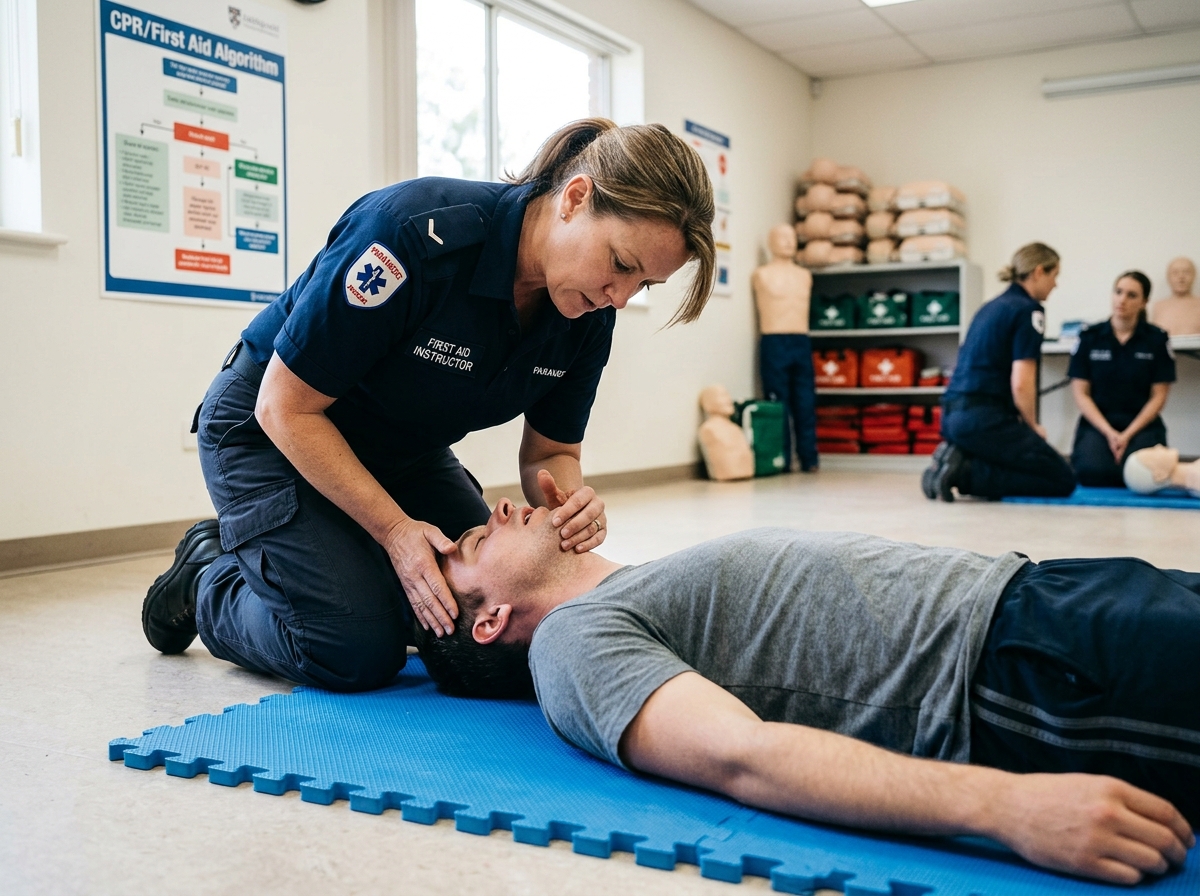
First Aid for Near Drowning & Mouth-to-Mouth Resuscitation (Coursebook Page 191)
- Yell for help from people around.
- Pull the casualty from water in case you are able.
- Apply mouth to mouth breathing: This opens up airways to restore breathing // Induces breathing.
- (i) Lie the person on his/her back and open his/her mouth.
- (ii) Press the nostrils with your fingers to close them.
- (iii) Bring your mouth to that of the victim's mouth.
- (iv) Blow air strongly into his/her mouth and then pause to let the air come out. Blow in again. Repeat this several times.
Prevention of near drowning: Covering water tanks and deep pits; fencing swimming pools and water sources; wearing life jackets when sailing; acquiring swimming skills; removing babies from water immediately after bathing; avoid playing near water bodies; relocating during floods.
Fainting (Coursebook Page 192)
Fainting: The sudden loss of consciousness for a short time.
Major cause of fainting: Reduced supply of oxygen to the brain.
Signs of fainting: Loss of body balance, body weakness, loss of sense.
12 Conditions leading to fainting: Prolonged hunger, vigorous exercise, shocking news, severe pain, anxiety and excitement, excessive bleeding, fear/being frightened, standing in sunshine for long, alcoholism, dehydration, and irregular heartbeat.
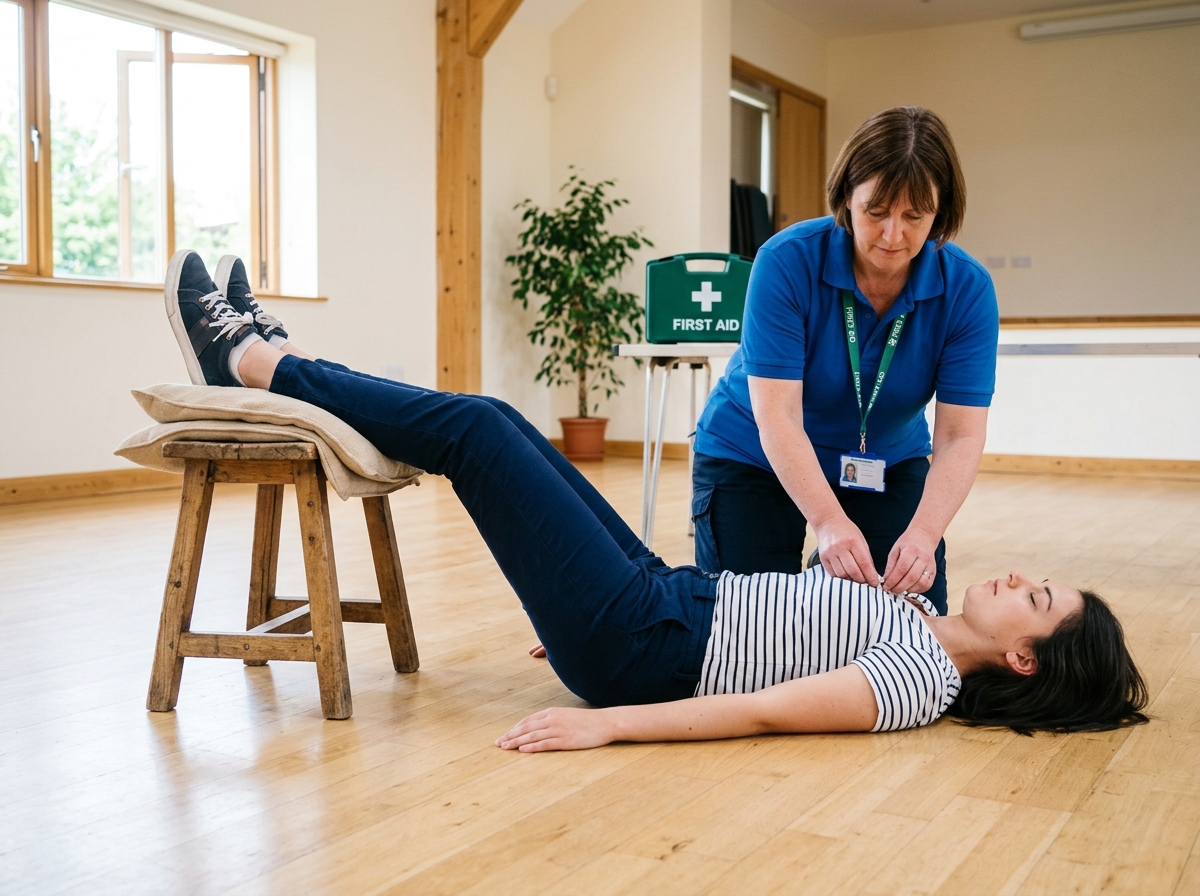
First Aid for Fainting (Coursebook Page 192)
- Lay the casualty on his/her back and raise the legs higher than the head:
Exact Textbook Reason: To allow the supply of oxygen to the brain. - Loosen tight clothes:
Exact Textbook Reasons: To ensure adequate supply of fresh air // To allow free blood circulation. - Fan the casualty in order for him/her to get fresh air.
- Put the casualty in a cool and open place to enable him/her to get fresh air.
1. Name the kind of accident that requires raising the legs higher than the head.
2. (a) State the difference between drowning and near drowning.
(b) Give any two causes of near drowning.
(c) State any one way in which you can help a near drowned casualty.
3. Why is it not possible to give first aid to a drowned casualty?
4. (a) What causes fainting?
(b) State any two conditions that can lead to fainting.
(c) Why are legs of a person who has fainted raised higher than the head when giving first aid?
5. State the purpose of pressing the belly of a casualty of near drowning.
6. Give one reason why a person who has fainted should be placed in a cool and open place.
7. How does prolonged hunger lead to fainting?
4. Foreign Bodies in Passages & Poisoning
Foreign bodies: Objects that enter through body openings (eyes, ears, throat, nose, anus, vagina). Examples: insects, dust, seeds, small stones, grass, iron filings, food particles.
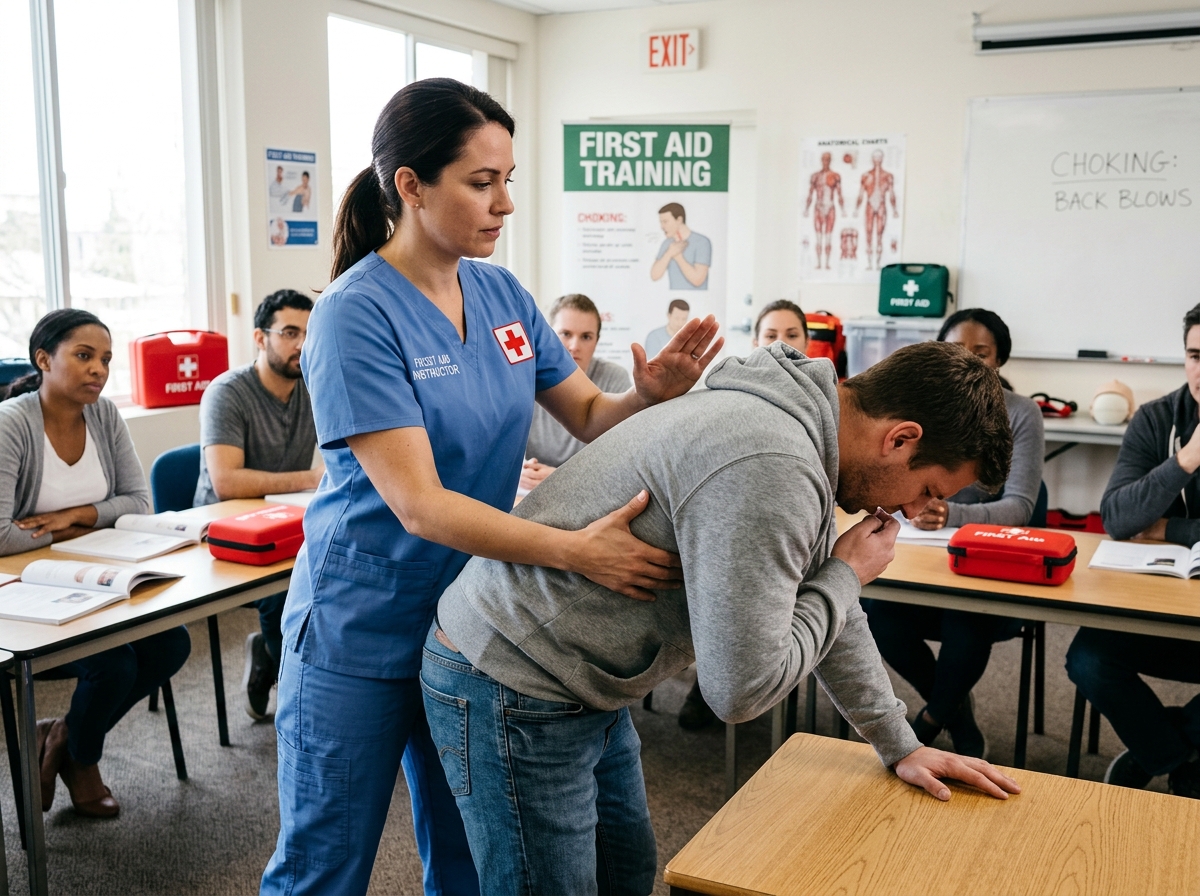
First Aid for Foreign Bodies (Coursebook Page 193):
| Body Opening | Examples of Objects | First Aid Procedure |
|---|---|---|
| In the Eyes | Small insects, sand, dust, seeds | Wash eyes with plenty of clean warm water; use soft clean cloth to gently wipe. Never rub eyes! |
| In the Ears | Insects, seeds, dust particles | Flush the ear with plenty of clean water. Never insert sharp objects like hairpins or needles! |
| In the Nose | Small seeds, stones, insects | Press the unaffected nostril and ask casualty to blow gently through the blocked nostril. |
| In the Throat (Choking) | Meat bones, large food chunks | Deliver 5 sharp back blows between shoulder blades; perform Heimlich abdominal thrusts. |
Poisoning: Corrosive vs. Non-Corrosive Poisons
Poison: Any substance that causes harm, illness, or death when introduced into the body. Children are the most common victims.
Examples: Paraffin, kerosene, acids, bleach.
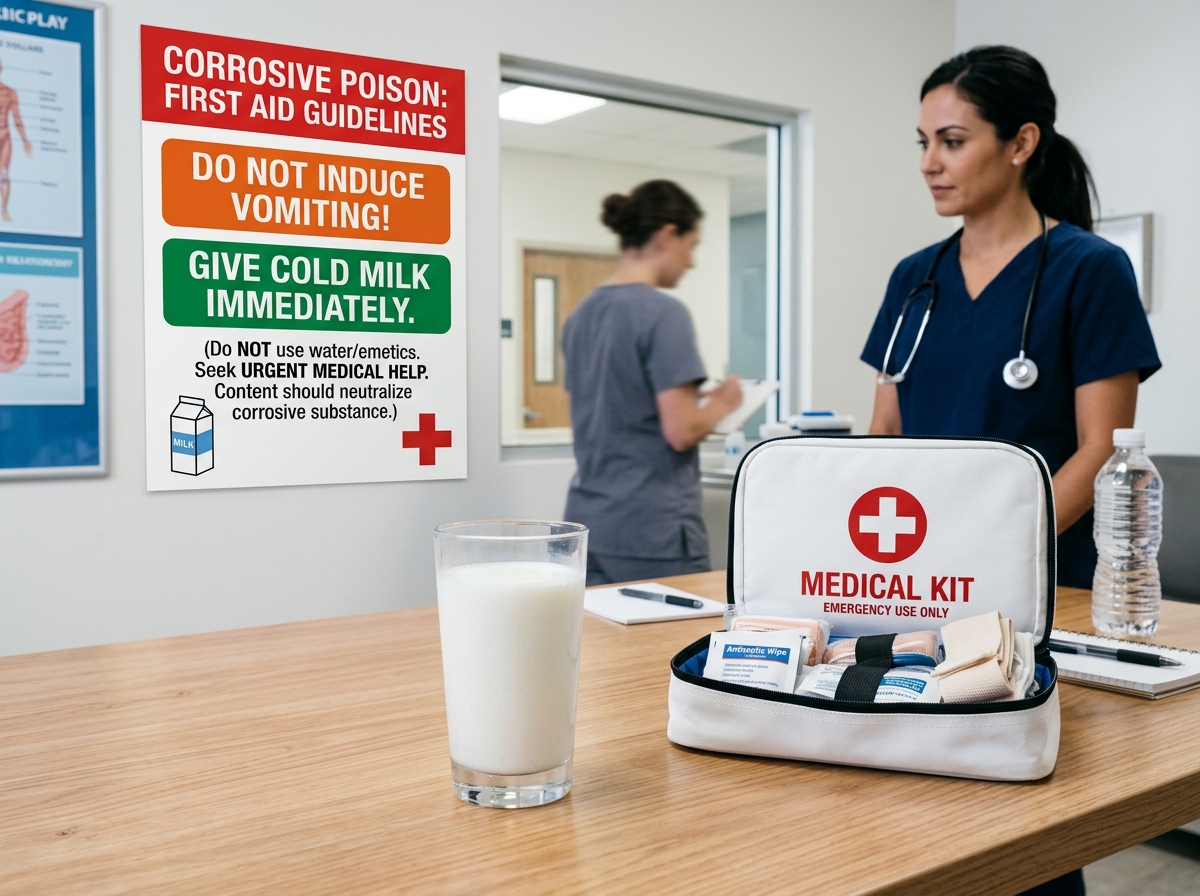
NEVER INDUCE VOMITING!
Reason: Corrosive chemicals burn tissues. Vomiting forces them back up, burning the throat and oesophagus a second time! Give cold milk to coat the stomach wall and rush to hospital.
Examples: Expired food, medicine overdose, seeds.
INDUCE VOMITING & GIVE MILK
Reason: These do not burn tissues. Vomiting purges the poison before absorption. Give cold milk to dilute concentration and rush to hospital.
Insect Stings and Snake Bites
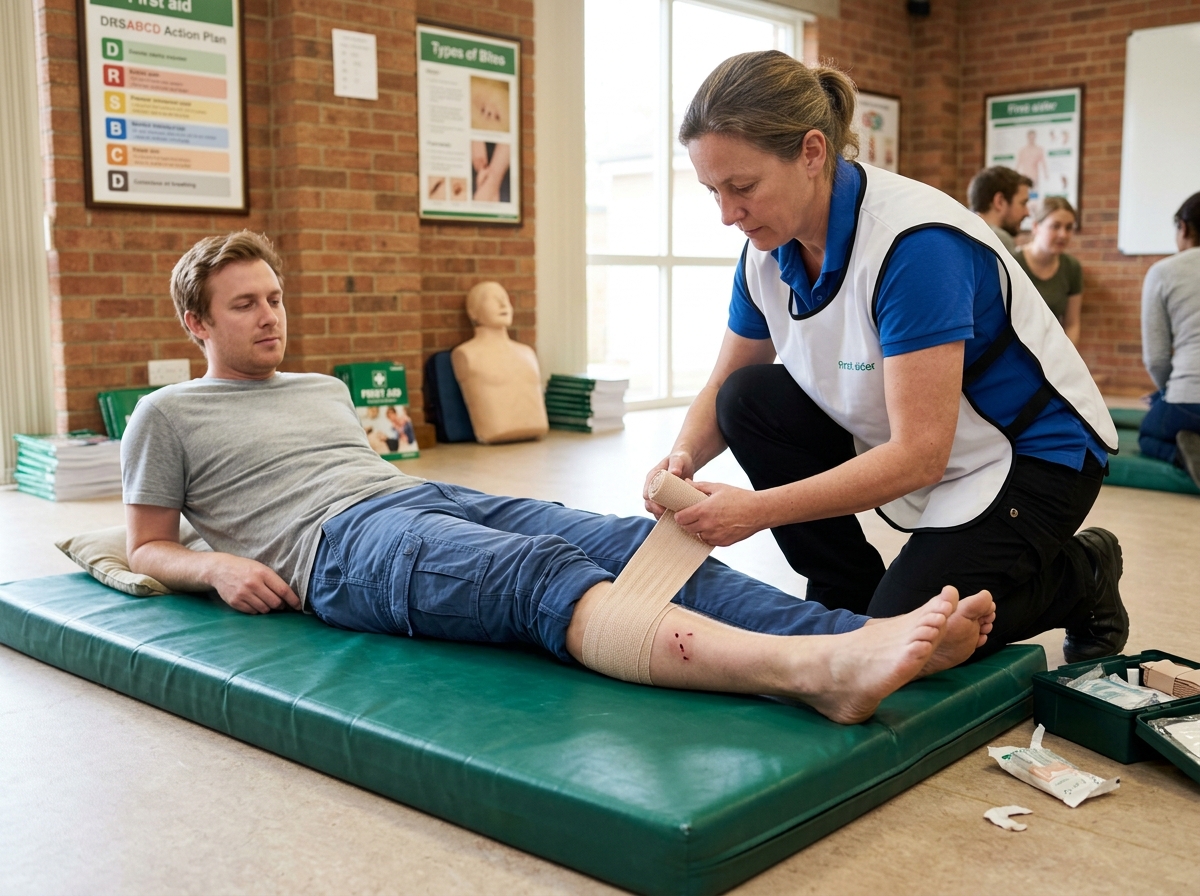
- Insect Stings (Bees & Wasps): Scrape out stinger gently; apply baking soda paste for bee stings (acidic) or dilute vinegar for wasp stings (alkaline); apply cold compress for swelling.
- Snake Bites: Keep casualty completely calm; keep bitten limb lower than the heart; tie a tourniquet slightly above the bitten part (Reason: To prevent or slow down the fast flow of venom through the bloodstream to the heart); rush to hospital for antivenom.
📝 PLE Exam Practice — Topic 10
1. State the type of injury caused by hot steam from a boiling kettle.
2. Why is a third-degree burn casualty advised to drink plenty of fluids like clean water or fruit juice?
3. Why should a first aider never induce vomiting in a child who has accidentally swallowed paraffin?
4. State the reason why a hard object should be put into the mouth of a convulsing person.
5. Explain why the legs of a fainted pupil are elevated higher than the head.
TOPIC 11: SANITATION & WASTE MANAGEMENT
1. Introduction & Ways of Promoting Sanitation
Sanitation: This is the general cleanliness of the environment in which we live to promote public health and control diseases. Good sanitation is a key element of Primary Health Care (PHC).
Poor Sanitation: A condition in which the environment where people live is unhygienic.
The Scientific Purpose of Good Sanitation (Coursebook Page 196)
- Controls the easy spread of disease-causing germs.
- Eliminates bad odors and foul smells in our living environment.
- Reduces and controls the population of disease-carrying vectors (e.g. houseflies, mosquitoes, cockroaches).
Activities Carried Out to Promote Sanitation (Coursebook Page 197)
- Sweeping compounds and rooms to remove dust and dry rubbish.
- Mopping floors using water and detergents to remove sticky dirt and germs.
- Slashing tall grass and bushes around homes to destroy the breeding and hiding places of mosquitoes, snakes, and rodents.
- Scrubbing latrines, toilets, and urinals regularly with disinfectants.
- Proper disposal of human wastes (feces and urine).
- Digging rubbish pits for organized and safe garbage disposal.
- Draining stagnant water to prevent female anopheles mosquitoes from laying eggs and breeding.
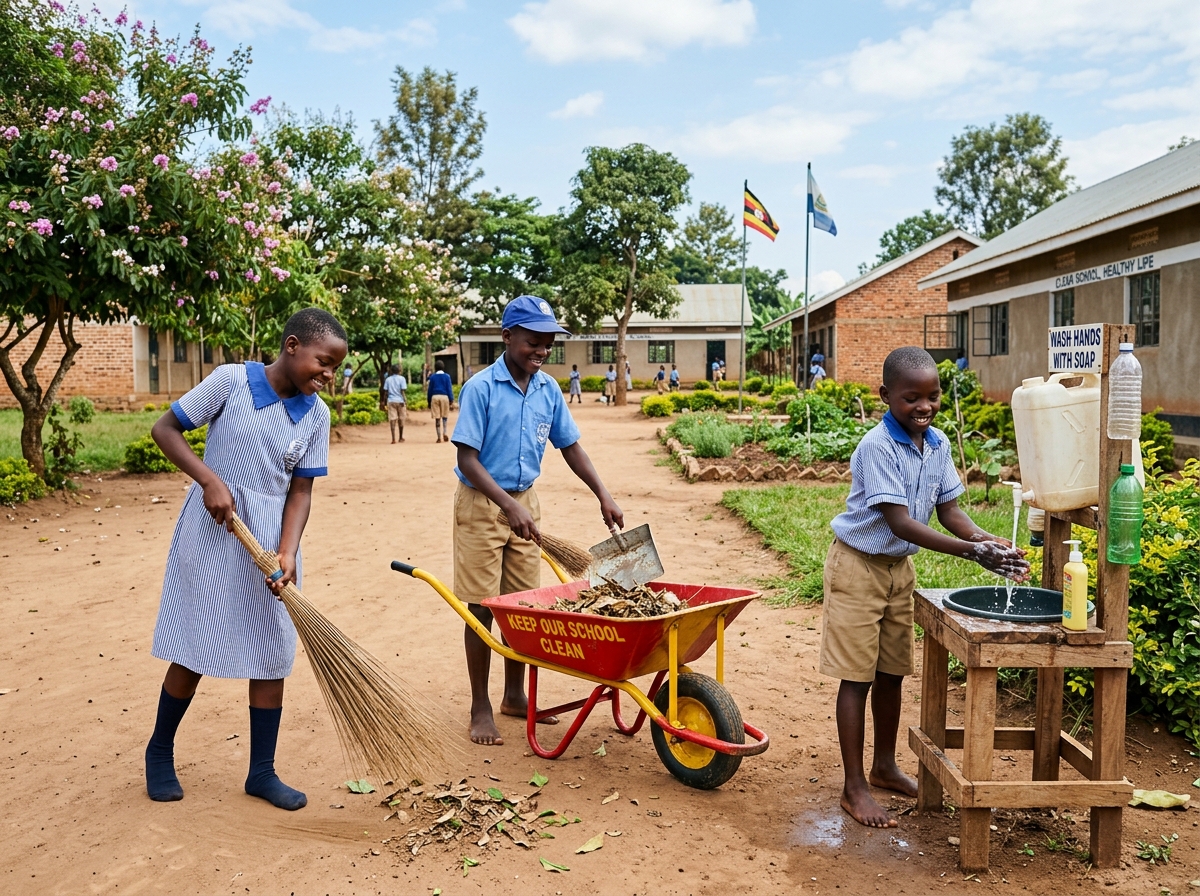
Tools and Items Used to Promote Sanitation
- Brooms & Brushes: For sweeping compounds and scrubbing latrine slabs.
- Dustbins & Wheelbarrows: For collecting and transporting garbage to the compost/rubbish pit.
- Rakes & Hoes: For gathering dry leaves and clearing weeds around living quarters.
- Mops, Buckets & Disinfectants: For washing floors and sterilizing surfaces.
2. Intestinal Communicable Diseases & The 4Fs / 5Fs Germ Path
A communicable disease is an infectious illness that can be transmitted from an infected host to a healthy person. Good sanitation directly breaks the fecal-oral chain of diarrhoeal diseases like cholera, dysentery, typhoid fever, and bilharzia.
The 4Fs / 5Fs Transmission Chain (Coursebook Page 200)
FAECES (Human Waste) ➔ FLIES (Vectors) ➔ FOOD (Utensils) ➔ FINGERS (Dirty Hands) ➔ FLUIDS (Contaminated Water) ➔ HEALTHY PERSON
- Faeces: The infected human waste containing living pathogens.
- Flies: Vectors that land on feces, picking up germs on their hairy legs and wings.
- Food: Uncovered food or clean kitchen utensils contaminated by flies landing on them.
- Fingers: Unwashed hands that touch contaminated food or dirty latrine door handles.
- Fluids: Unboiled drinking water contaminated with fecal surface runoff.
The 3Ds of Diarrhoea (Coursebook Page 201)
Examiners summarize the severe biological complication of untreated diarrhoeal diseases as:
- Diarrhoea: The frequent, involuntary passing out of watery stools many times a day.
- Dysentery: The frequent passing out of watery stools containing visible blood stains and mucus.
- UNEB Distinction: Diarrhoea produces pure watery stool; dysentery produces watery stool mixed with blood.
Signs, Symptoms and Management of Dehydration (Coursebook Page 202)
Dehydration: A physiological condition where the body loses excessive water and essential mineral salts (sodium, potassium).
- Signs (What can be seen): Sunken eyes, sunken fontanelle in infants, dry pale skin that does not snap back when pinched, dry cracked lips, rapid weight loss.
- Symptoms (What the patient feels): Severe thirst, extreme body weakness, dizziness, and loss of consciousness.
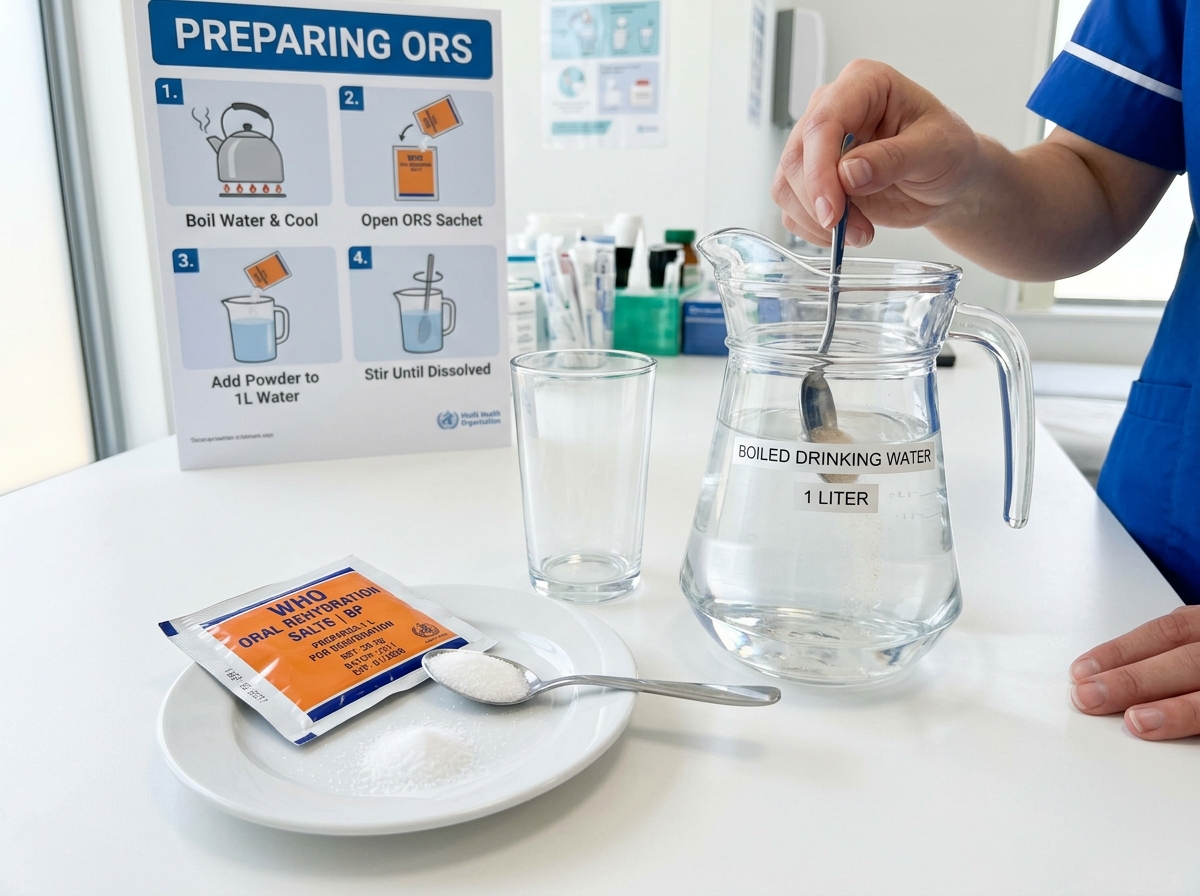
- Role of Salt: Replaces lost mineral salts (sodium and chloride ions).
- Role of Sugar: Replaces lost energy (glucose for cellular respiration).
- Role of Boiled Water: Replaces lost body water volume and rehydrates tissues.
3. Types of Latrines and Toilets (Coursebook Pages 204–207)
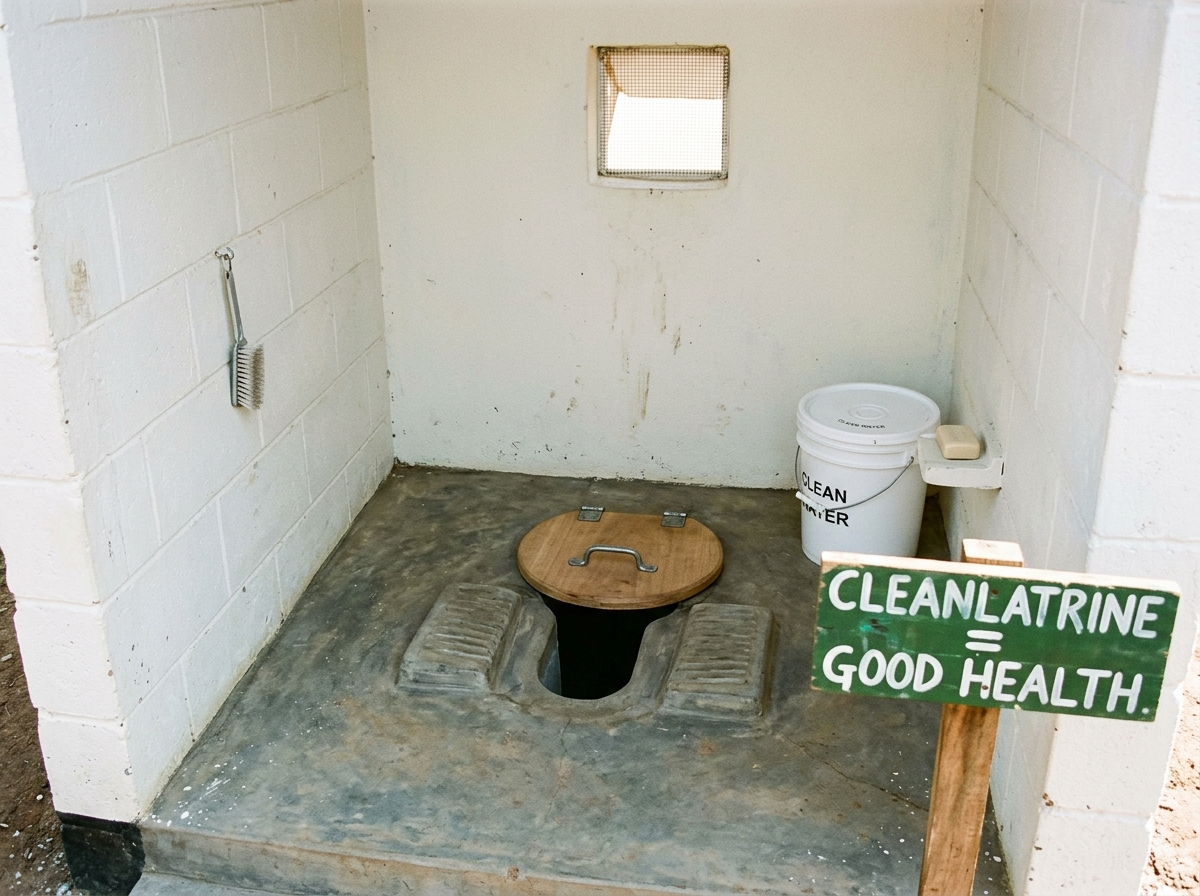
A. Ordinary Pit Latrine (Conventional Latrine)
A deep pit dug into the ground (minimum 6 meters deep) covered with a concrete slab.
- Key Requirement: Must have a tight-fitting lid or cover over the squat hole.
- Functions of the Tight Lid:
- Blocks bad odors and foul smells from escaping into the latrine room.
- Prevents houseflies and cockroaches from entering the pit to feed and lay eggs on feces.
- Maintenance: Smoking the pit with hot wood ash to suppress odors and pests.
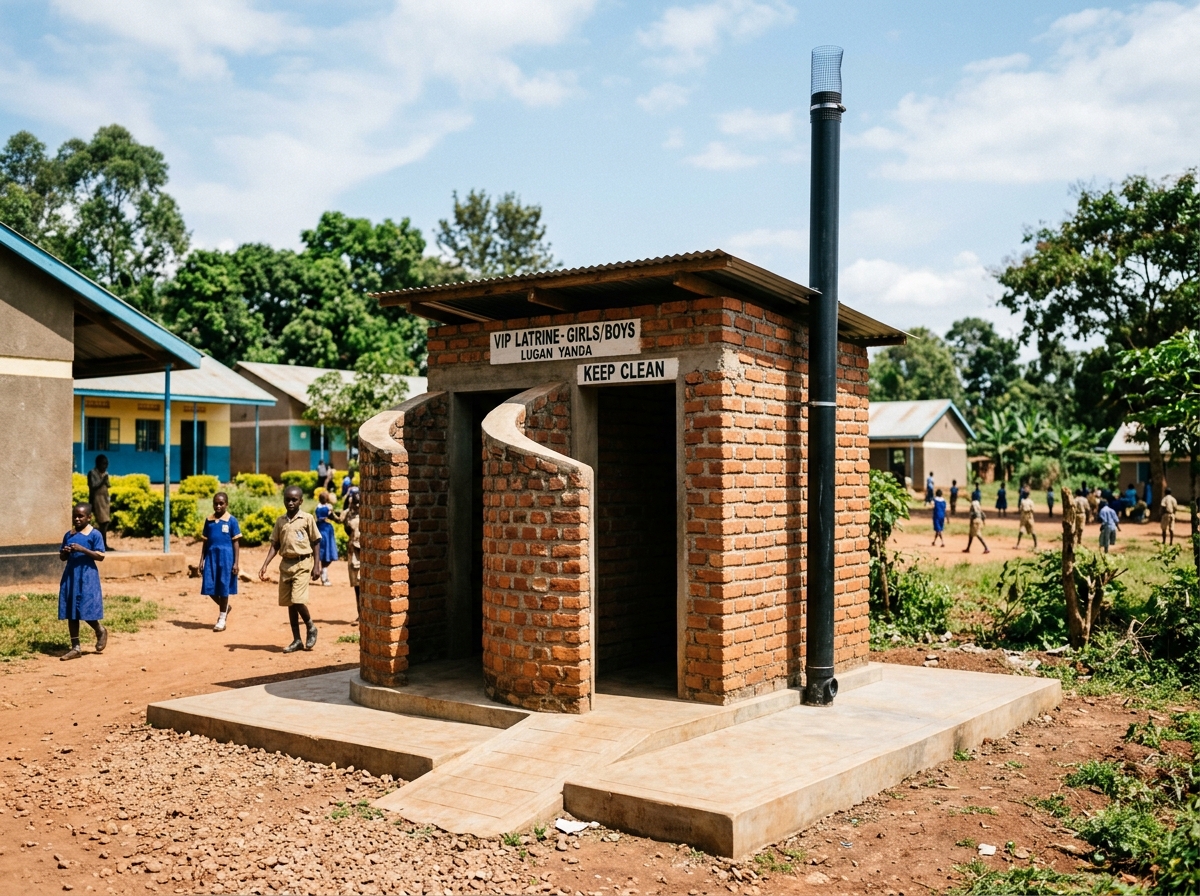
B. Ventilated Improved Pit (VIP) Latrine
An advanced pit latrine designed to naturally eliminate foul smells and trap flies without requiring a lid on the squat hole.
- 1. The Vent Pipe: A vertical PVC or brick chimney fitted from the pit to above the roof.
Mechanism: The pipe absorbs solar radiation. The air inside heats up, expands, becomes lighter, and rises out. This draws foul pit gases upward and creates a continuous fresh air downdraft through the squat hole. - 2. The Fly Screen (Wire Mesh): Fitted securely at the top of the vent pipe.
Function: Flies inside the dark pit are attracted to the sunlight at the top of the vent pipe (phototropism). When they fly up, they get trapped under the wire screen and die of starvation and exhaustion. - 3. No Drop Hole Lid (Always Open!):
UNEB Exam Reason: The drop hole must be left open at all times to allow a continuous downward flow of fresh air that pushes smelly pit gases up through the vent pipe. - 4. Spiral-Shaped Wall Entrance:
Function: Eliminates the need for a door while keeping the latrine room interior dark, ensuring flies in the pit are only attracted upward toward the sunlight at the vent pipe top.
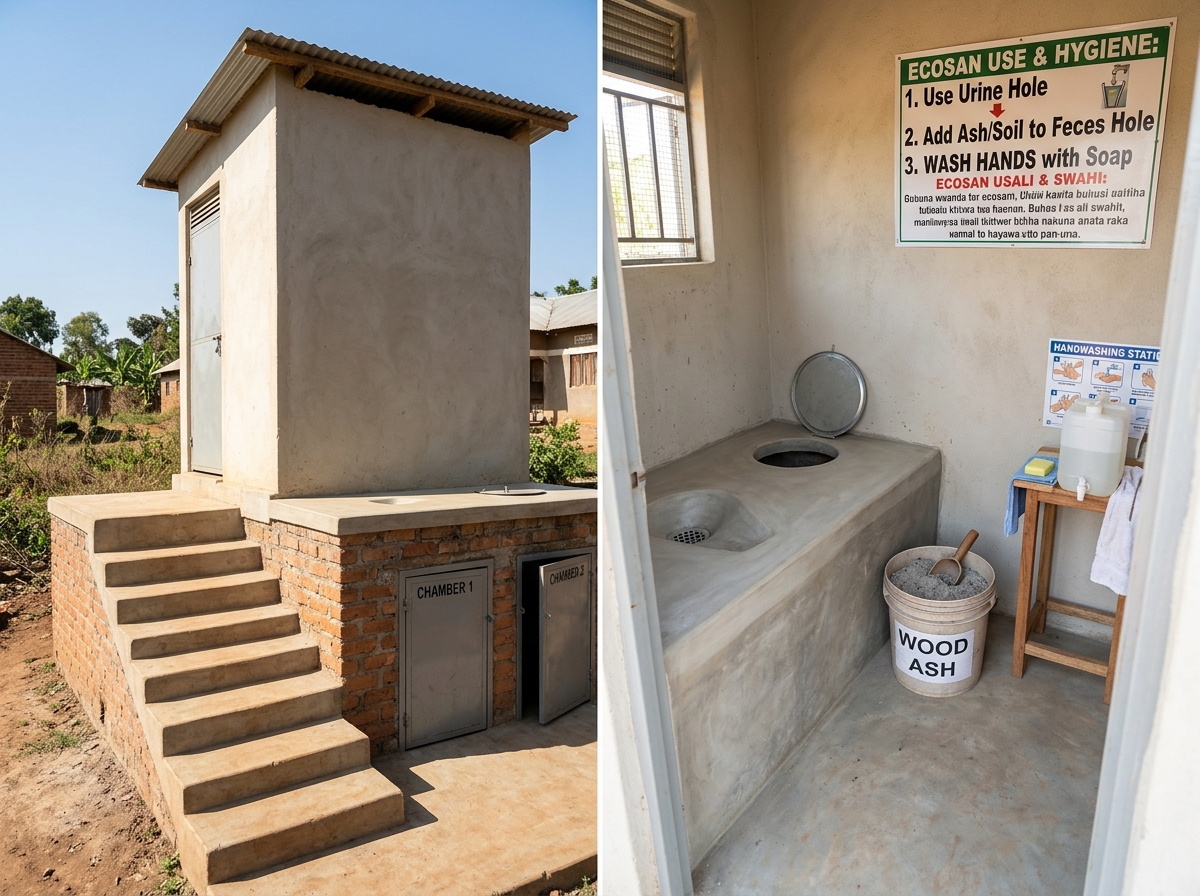
C. Ecosan Latrine (Ecological Sanitation)
An above-ground dry toilet system that separates urine and feces into two distinct compartments.
- The Dry Principle: Wood ash, lime, or dry soil is sprinkled over the feces after every use.
- Role of Wood Ash / Lime: Dehydrates feces, neutralizes foul odor, and raises the pH (alkalinity) above 9.0 to kill all disease pathogens and parasite eggs.
- Agricultural Advantage: After several months of desiccation, human waste converts into safe, odor-free, pathogen-free organic fertilizer (manure) for garden crops.
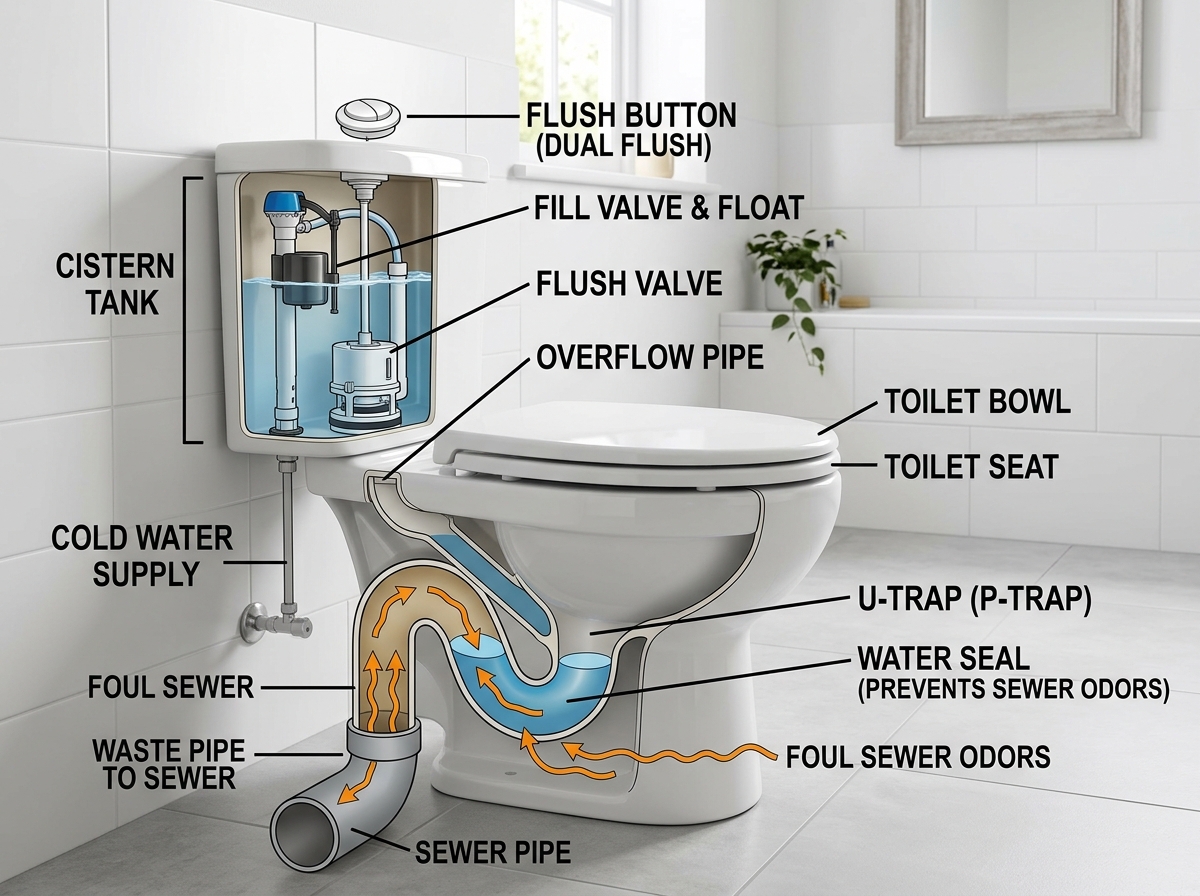
D. Water Closet (Flush Toilet)
A modern water-borne toilet system connected to an underground septic tank or municipal sewer network.
- Cistern (Water Tank): Stores water under gravity pressure to flush away wastes.
- Toilet Bowl: Receives urine and feces.
- The U-Trap (Water Seal): A curved pipe section below the bowl that holds a permanent volume of clean water.
Scientific Function: The water seal acts as a physical barrier preventing foul sewer gases, methane, and insect vectors from coming back into the bathroom. - Maintenance: Flush after every use, scrub regularly with toilet brush and disinfectant, and never throw hard items (stones, sanitary towels) to prevent clogging.
4. Beneficial Bacteria & Chemical Caution in Latrines
These are harmless, naturally occurring micro-organisms living inside pit latrines that decompose and break down solid human fecal waste. Their decomposition action significantly reduces waste volume and prevents pit latrines from filling up too quickly!
Never pour carbolic acid, strong chemical disinfectants, or chemical insecticides into a pit latrine!
Scientific Reason: These chemicals kill the beneficial putrefying bacteria responsible for waste decomposition. Without bacteria, feces cannot decompose, causing the latrine pit to fill up very quickly.
Fill in the comparative analysis table based on your classroom study of latrine engineering:
| Latrine Type | Primary Odor Control Method | Fly Control Mechanism | Drop Hole Lid Needed? |
|---|---|---|---|
| Ordinary Pit Latrine | Tight lid & smoking with ash | Tight fitting wooden lid | YES (Must have lid) |
| VIP Latrine | Solar convection vent pipe | Top wire mesh fly screen | NO (Must stay open) |
| Ecosan Latrine | Wood ash desiccation | Dry alkaline environment | Covered when not in use |
| Water Closet (WC) | U-trap clean water seal | Flushing with water | Toilet seat lid |
1. Give the meaning of the following terms:
(b) Personal hygiene:
2. State any two signs of poor sanitation in a school compound.
3. Give any two diseases that can break out due to poor sanitation in a community.
4. State the scientific function of the screen (wire mesh) on top of the vent pipe of a VIP latrine.
5. Why is the drop hole of a VIP latrine left open without a lid at all times?
6. State the function of the U-trap in a water closet (flush toilet).
7. Why is it dangerous to pour highly acidic substances or strong chemical insecticides into a pit latrine?
8. How does the application of wood ash in an Ecosan latrine help to control bad odors and germs?
9. How is dysentery biologically different from simple diarrhoea?
10. State the specific biological roles of salt and sugar in Oral Rehydration Solution (ORS):
(b) Role of sugar:
📝 PLE Exam Practice — Topic 11
1. State the scientific reason why a pit latrine should be dug at least 30 meters away from a water source.
2. Explain how spiral walls help to control houseflies in a VIP latrine.
3. What danger is caused when human feces are left exposed in an open school garden?
4. Why is it important to wash hands with clean water and soap immediately after using a latrine?
5. How does an Ecosan toilet contribute directly to crop farming in Uganda?
TOPIC 12: THE REPRODUCTIVE SYSTEM
1. Puberty, Adolescence & Sex Characteristics
Reproduction: The biological process by which living organisms produce offspring of their own kind to prevent extinction and ensure the continuity of life.
Adolescence: The transitional period of physical, physiological, and psychological development between childhood and adulthood.
Puberty: The stage of rapid physical growth during which an individual becomes sexually mature and capable of reproducing.
• Testosterone: Produced by testes in boys; triggers male secondary sex characteristics.
• Estrogen & Progesterone: Produced by ovaries in girls; trigger female secondary sex characteristics and regulate menstruation.
Primary vs. Secondary Sex Characteristics
- Primary Sex Characteristics (Present at Birth): Physical reproductive organs a child is born with (penis, testes, scrotum, vas deferens in males; ovaries, oviducts, uterus, cervix, vagina in females).
- Secondary Sex Characteristics (Occur at Puberty): Physical changes developing during puberty (voice change, beard, broad chest in boys; breast growth, wide hips, menstruation in girls).
2. Male Reproductive System Anatomy & Physiology
Consists of organs responsible for producing, storing, and depositing male gametes (sperm cells):
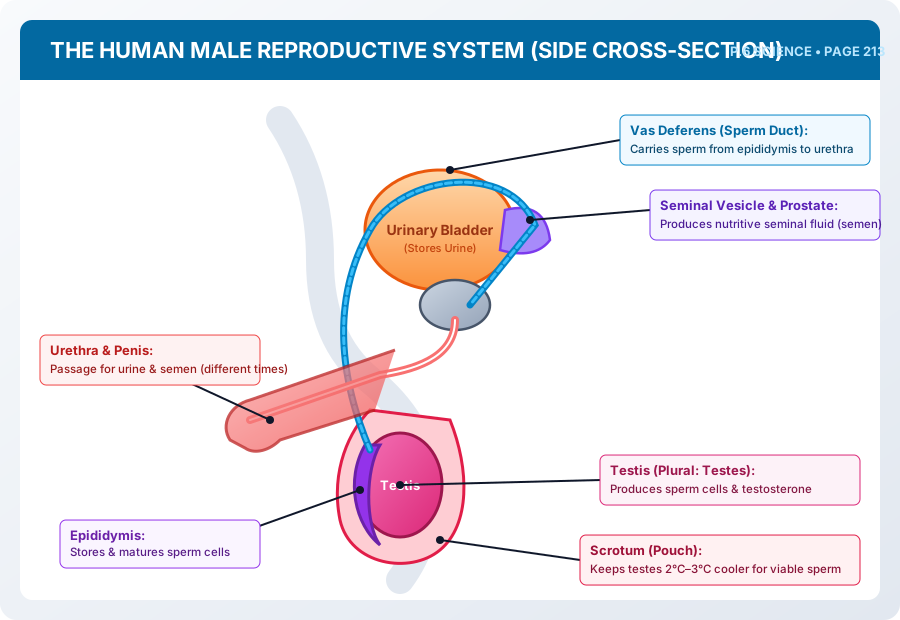
Functions of Male Reproductive Organs (Coursebook Pages 213–214)
- Testes (Plural: Testes): Produce male gametes (sperm cells) and secrete testosterone hormone.
- Scrotum: Skin pouch that suspends testes outside abdomen to maintain a temperature 2°C–3°C cooler than body temperature (37°C), which is required for viable sperm survival.
- Epididymis: Coiled tube behind each testis that stores sperm cells to mature and gain motility.
- Vas Deferens (Sperm Duct): Tubes that transport mature sperms from the epididymis to the urethra.
- Seminal Vesicles & Prostate Gland: Produce nutrient-rich, alkaline seminal fluid that mixes with sperm to form semen.
- Urethra: Common muscular tube that discharges both urine and semen out of the body at different times.
- Penis: External copulatory organ that deposits semen into the female vagina during intercourse.
3. Female Reproductive System Anatomy & Physiology
Consists of organs that produce ova, facilitate fertilization, and support fetal gestation:
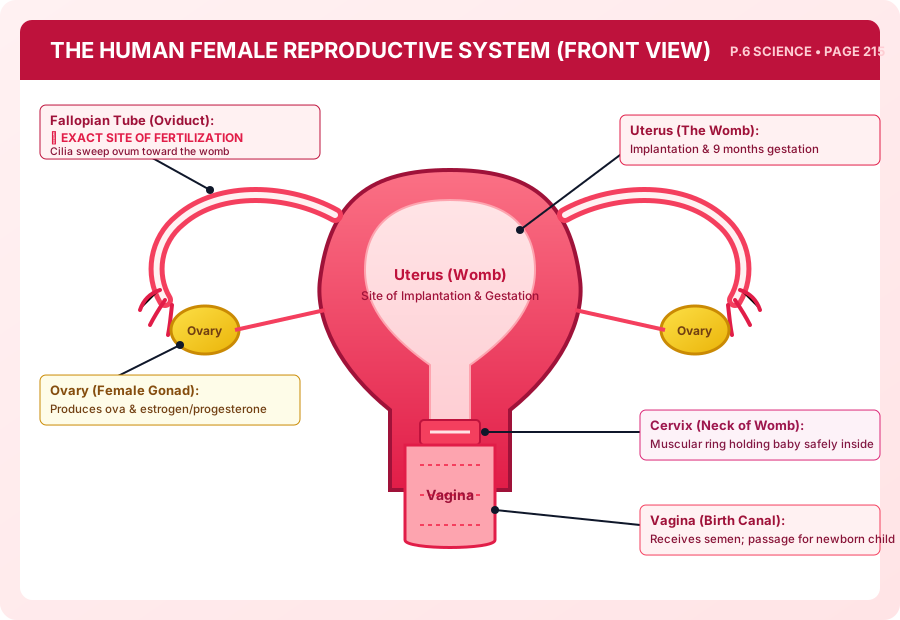
Functions of Female Reproductive Organs (Coursebook Pages 215–216)
- Ovaries: Produce female gametes (ova / egg cells) and secrete hormones estrogen and progesterone.
- Oviduct (Fallopian Tube): ⭐ EXACT SITE WHERE HUMAN FERTILIZATION OCCURS! Microscopic cilia lining the tube sweep the passive ovum toward the womb.
- Uterus (Womb): Thick, muscular, pear-shaped chamber where the embryo embeds (implantation) and develops into a baby for 9 months (270 days).
- Cervix: Muscular ring at the neck of the uterus that remains tightly closed to protect the fetus from physical injury.
- Vagina (Birth Canal): Receives semen during intercourse and forms the passage through which the baby is born.
4. Fertilization, Implantation, Twins & Sex Determination
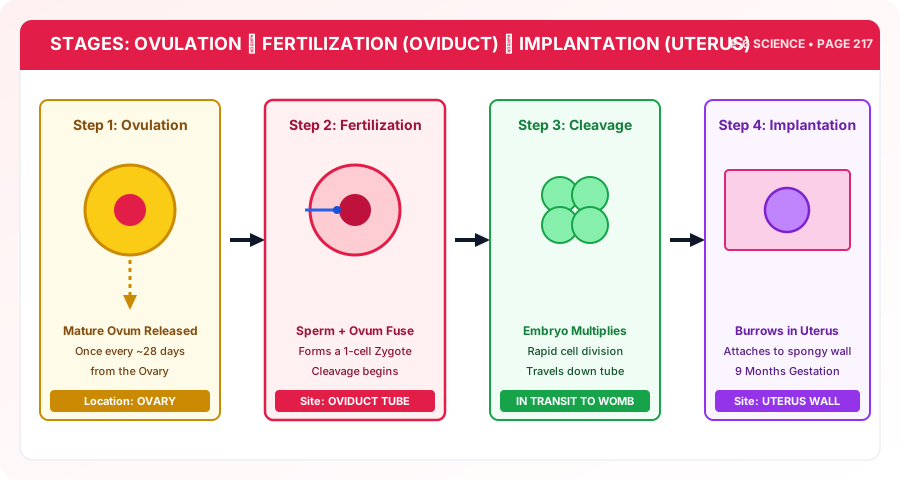
Ovulation: Release of a mature ovum from an ovary, occurring once every ~28 days.
Fertilization: Fusion of sperm nucleus with ovum nucleus to form a single-celled zygote (in the Oviduct).
Implantation: Embedding of the developing blastocyst embryo into the vascular wall of the Uterus.
The Science of Twins (Coursebook Page 219)
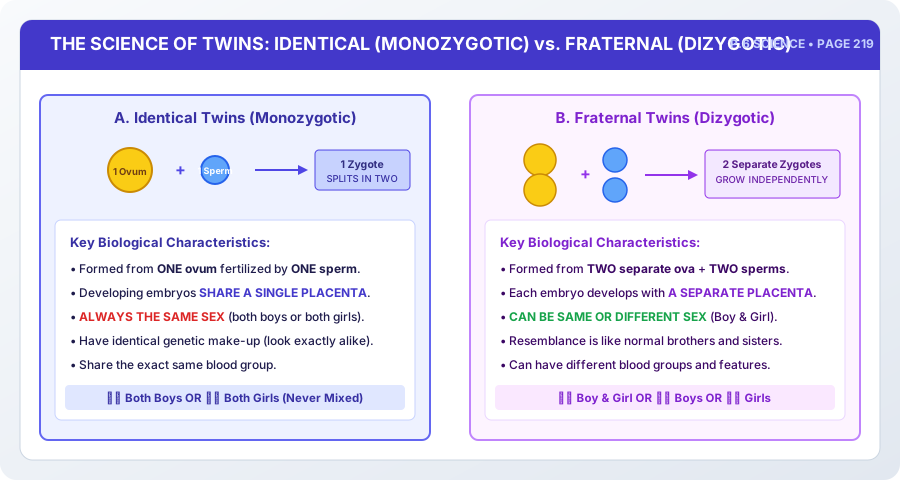
| Feature | Identical Twins (Monozygotic) | Fraternal Twins (Dizygotic) |
|---|---|---|
| Fertilization | ONE ovum + ONE sperm (splits in two) | TWO separate ova + TWO sperms |
| Placenta | Share ONE single placenta | Develop with TWO separate placentas |
| Sex of Babies | ALWAYS THE SAME SEX (both boys or both girls) | CAN BE DIFFERENT SEXES (Boy & Girl) |
| Resemblance | Identical appearance & same blood group | Resemble each other like normal siblings |
Sex Determination (Coursebook Page 220)
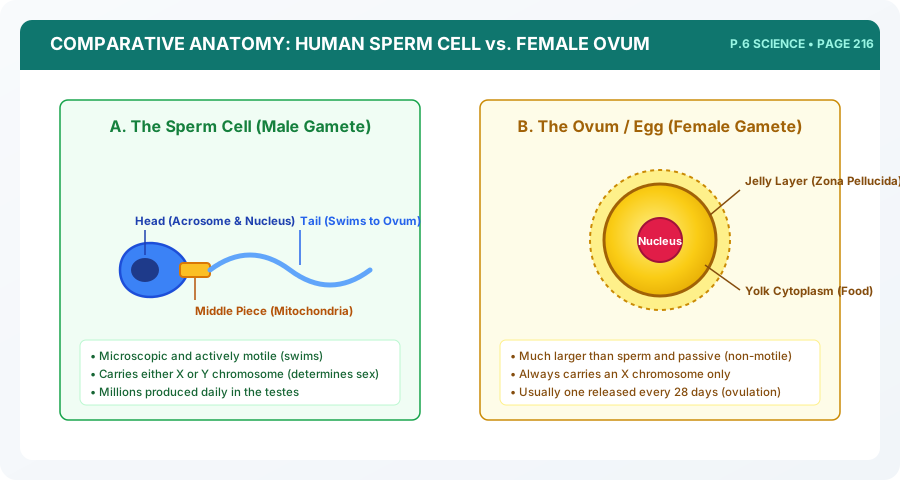
Human females carry XX chromosomes (ova carry X only). Human males carry XY chromosomes (sperms carry either X or Y).
• X-Sperm + X-Ovum = XX (Baby Girl 👧)
• Y-Sperm + X-Ovum = XY (Baby Boy 👦)
Conclusion: The father's sperm cell scientifically determines the sex of the baby.
5. STIs, Teenage Pregnancy & Family Planning
Sexually Transmitted Infections (STIs - Coursebook Pages 221–223)
- Gonorrhoea: Caused by bacteria. Thick yellow-green pus discharge, burning urination. Can cause fallopian tube blockage (infertility) and newborn eye blindness. Husband and wife must be treated together to prevent re-infection!
- Syphilis: Caused by bacteria. Painless chancres (sores) on genitals; damages heart and nervous system if untreated.
- Hepatitis B: Caused by virus. Attacks and destroys liver; jaundice, dark urine; vaccine preventable!
- HIV/AIDS: Human Immunodeficiency Virus destroys white blood cells (CD4 cells); body succumbs to opportunistic infections. Controlled through the ABC strategy (Abstinence, Be faithful, Condoms).
Teenage Pregnancy & Life Skills (Coursebook Page 223)
Underdeveloped pelvis causes obstructed labor, fistula, and high maternal mortality. Essential life skills: Assertiveness (confidently saying NO), Peer resistance, and Decision-making.
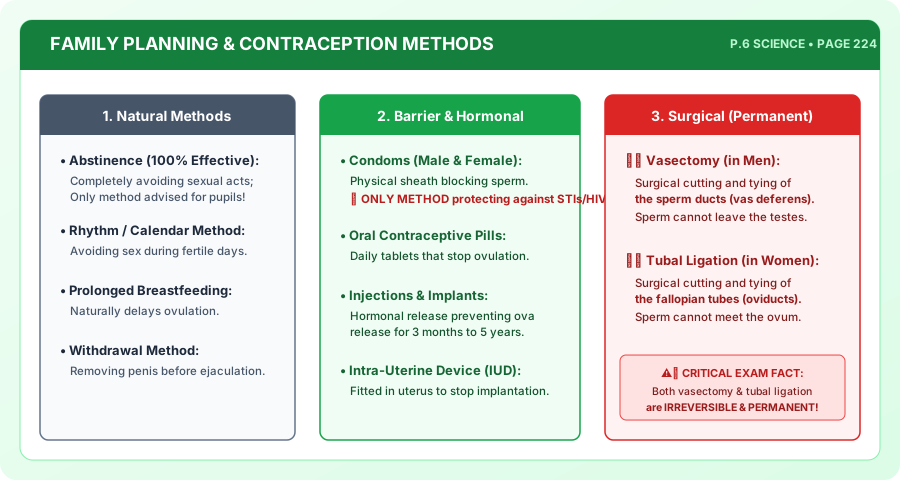
Family Planning Methods (Coursebook Pages 224–226)
- Natural: Abstinence (100% effective and recommended for pupils), Calendar/Rhythm, Prolonged breastfeeding.
- Barrier & Hormonal: Condoms (the ONLY method protecting against both pregnancy and STIs/HIV), Pills, Injections, Implants.
- Permanent Surgical:
• Vasectomy: Sperm ducts (vas deferens) cut and tied in men.
• Tubal Ligation: Fallopian tubes (oviducts) cut and tied in women.
Both surgical procedures are completely irreversible!
1. Match the reproductive organs to their correct biological functions:
(b) Epididymis:
(c) Cervix:
(d) Urethra:
2. State any two structural differences between a male sperm cell and a female ovum:
3. State the exact site of human fertilization in the female body:
4. Why is a husband and wife advised to receive medical treatment together when diagnosed with gonorrhoea?
5. State the biological difference between identical twins and fraternal twins regarding placenta formation:
6. How does the position of the scrotum outside the abdomen help in sperm production?
7. Name the family planning method that is 100% effective and best recommended for primary school pupils:
8. What is the scientific difference between a vasectomy and a tubal ligation?
📝 PLE Exam Practice — Topic 12
1. State the exact part of the female reproductive system where fertilization occurs.
2. How is the function of the anthers in a flower similar to that of the testes in a human male?
3. State the primary sex characteristic in human males.
4. Explain why the sex of a human baby is determined by the father rather than the mother.
5. Give one life skill that enables an adolescent girl to avoid teenage pregnancy.